Posts in Vintage Container Design
Local Gardener Receives Royal Treatment

This past spring, the Village Garden Club of La Jolla brought Englishman Shane Connolly to San Diego for it's fifth "Meet the Masters 2012" program. This program is an annual garden club highlight, and it's keynote speakers are generally the highest caliber of internationally acclaimed floral designers.

In April of 2011, Shane Connolly led the floral design team for the marriage of Their Royal Highnesses, the Duke and Duchess of Cambridge, better known as Prince William and Kate Middleton. Remember the surprise tree-lined aisle inside Westminster Abbey. Connolly has designed floral creations for the royal family for over twenty years. Known for his sustainability interests and natural approach to floral design, his clientele is worldwide.

During his time in the San Diego area, while demonstrating his floral design, Connolly  spoke freely on his unique approach to floral design. Connolly has a broad foundation as an artist and a musician. His first professional field was psychology, and his floral design career blossomed unexpectedly from friends urging him to try it.

Connolly is proficient in the symbolic language of flowers and this knowledge only enhances his floral designs.  Connolly's sustainability interest and natural approach to floral design is simply refreshing. Connolly was also eager to tease his enthusiastic audience with tiny snippets about Prince William and Kate Middleton's wedding.

Connolly demonstrated and spoke his way through numerous floral designs at his formal presentation at the Museum of Contemporary Art in La Jolla, on Thursday, March 8, 2012. The following day, he toured, created a massive floral design, and enjoyed a social lunch at Lani Freymiller's North County private garden with a distinguished group of 35 LJVGC members.

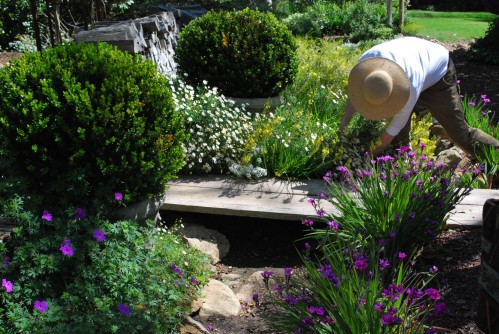
Freymiller, a retired grade school teacher, is an artist in her own right with an impeccable eye. She has designed her breath-taking garden slowly over a period of nearly 40 years, and has received countless accolades and recognition. Perhaps the grandest compliment yet, is her local garden receiving this royal treatment.

Touring through Freymiller's stunning garden, Connolly choose sprays of Cherokee Rose, Tuscan Blue Rosemary, Pearl Acacia, Mock Orange, Rue, Silver Waves Camellia and many others. He also shared best pruning practices, such as prune from the trunk always, and prune first errant growth at the bottom of plants. In time, he had his desired mixture of garden cuttings to create his grand garden floral design. His container of choice naturally was a vintage tub.

Connolly charmed everyone, as he continued to share his design tips and philosophy. Freymiller was a gracious and  extraordinary hostess,  warmly sharing her beautiful garden. This special day will be fondly remembered by those attending for a very long time.

Connolly's Tips for Timeless Artisan Floral Decorations & Sustainability:

-- "Use a few seasonal flowers simply, with the prime objective of showing them off and emphasizing their individual characteristics."

-- "Designs live on after being created."

-- "Group things together, it is more like they grow in the garden."

-- "Use chicken wire, instead of an oasis. Put flowers in water."

-- "Let  flowers tell you where it wants to be in the arrangement. Lovely to let flowers do what they want to do."

-- "When you've done something, walk away from it. You can angst too much over flowers, and take their soul."

-- "Conditioning of things is most important, and the condition of things."

-- "I like shades of color. Don't dilute color with green."

-- "I like things that look like they were grown in someone's garden."

-- "I like using two same containers in different sizes."

-- "When doing an arrangement, tougher things go in first."

-- "You want  a physical balance, as well as a visual balance." Antithesis  of arrangements is to make a shape. Asymmetrical looks artful."

-- "The love of garden dictates your designs."

--"I think everyone should get their hands in some mud."
Cooking Up a Vintage Container

Take one vintage cooking pot with handle. Add small rocks in the bottom of the pot for drainage, or optionally drill five-spaced small holes. Add rich, organic potting soil. Select interesting plants such as a dramatic pink-spiked foxglove, and lacy "spring to fall" blooming alyssum. Add dark green reindeer moss around the plants to cover your soil and soften your container look. In no time, you have a spring blooming vintage container design.

That is the beauty of vintage container design. Re-purposed and planted with vibrant flowering plants, now this cooking pot has been magically transformed into something so much more. Train your eye to look for potential containers that might be a little of out of the ordinary, and you certainly will be rewarded with eye-catching results.

Please share some of your unusual containers you have had fun planting. Please comment on what stands out for you in a good container design.

Herb Garden a la Wine Barrels

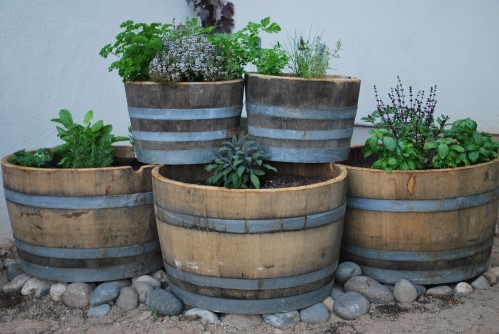
Herb Garden a la Wine Barrels This spring I created a small herb garden in a quiet, sunny, protected corner next to my barn using vintage wine barrels. I borrowed this concept, modifying it slightly, from Rosalind Creasy's, Edible Landscaping book. This is a terrific book for incorporating more edibles in your landscaping. Rosalind has a whole chapter on "Designing With Herbs."
An "herb garden a la wine barrels," was multi-dimensional for me. My husband, John, and I make wine, and have access to used wine barrels. We have a functional barn, with a trio of wine barrels already planted with blueberry bushes and strawberries on the right side, why not do something on the left with wine barrels, such as herbs. This particular spot is also close to my kitchen, a must for any herb garden.

I used a trio of half barrels from standard wine barrels, cut in half. You can find these types of barrels for sale at home improvement stores such as Home Depot and Dixieline, nurseries, and garden centers. For my second top row, I used a smaller 15 gallon wine barrel, cut in half and sanded along the edges. All wine barrels need to have spaced holes drilled for adequate drainage. I also placed my bottom wine barrels on top of carefully placed river rocks to save the barrels from rotting in the soil, and allowing further drainage.

Since the barrels are big, it is best to use a sterile filler or upside down one gallon size plastic plant containers. It will save you on filling the entire barrel with soil, mulch, etc. I simply placed my second row, and smaller wine barrels securely on the sides of the base half-barrels, using their weight to stabilize them.

Fill your barrels with clean potting soil, almost to the rim of each barrel. You can add an irrigation system if you like. I chose not to. Select your favorite herbs, and plant. I planted chives, winter savory, curly parsley, Italian parsley, tarragon, sorrel, Italian oregano, sage, cinnamon basil, and Italian basil. Choose herbs that you use frequently in your cooking, and a mixture of annual and perennial herbs. Choose some herbs that have a trailing habit, so as they grow and establish themselves, they will spill over the barrels. As time goes on, you can always switch out herbs for new ones when needed.

Add a layer of mulch on top of your soil, and around your herbs.  Newly planted herbs like to be kept moist initially, and water moderately once established.

Please share if you grow herbs to cook with. Please share how your herb garden is set up and designed.

Wine Box Container Gardening

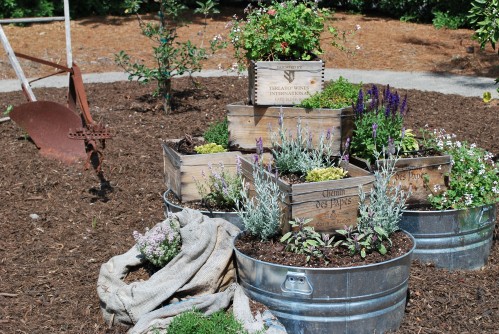
On the recent tour of this year's Encinitas Garden Festival, one of the private gardens had a beautiful white-picket fence enclosing an immaculate raised bed vegetable garden. Adjacent to the vegetable garden was an open area with a pathway and fruit trees. In addition, there was a fabulous focal point of creative staggered containers, using wine boxes, galvanized tubs, and burlap bags. Something so simple, with a "wow" factor. It is structural, functional, beautiful, clever, and unique all in one. Hats off to this homeowner, and their herb garden.

This is reminiscent of an idea in Rosalind Creasy's new book, Edible Landscaping, where she describes how to stagger and arrange different size half-wine barrels for a perfect container grouping.
Most of these containers can be found in local farm and garden supply stores, such as Grangettos, Home Depot, or even flea markets for the weathered and rusty look. Look around your garage, sheds, utility areas for possible containers you might already have. Wine boxes can be found at wine shops, wineries, and friends who are in wine clubs.

It is still important to create holes for drainage in the case of the galvanzied tubs, and line the wooden wine boxes with heavy plastic, small rocks for drainage, and then your preferred soil. Eventually burlap bags will break down exposed to weather elements, but will hold up through a few seasons. Gardener's burlap is strong, yet very reasonable, coming in ready-sewn bags, or longer sheets of material.

With very little expense, and a lot of creativity, you might be able to create a unique container focal point in your garden, too.

VintageGardenGal Tidbit Thyme...

Attention Chicken Lovers! Spruce up your chicken coop for VintageGardenGal's Annual Chicken Coop Photo Contest. Send in your photos this month to bonnie@vintagegardengal.com

Succulents, Front and Center

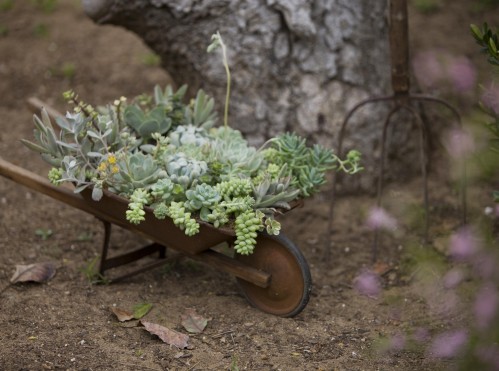
Country Gardens Magazine, Photo by Ed Gohlich Country Gardens magazine Spring 2011, features VintageGardenGal's fun combination of vintage containers and succulent design in their article, "Show Off Succulents." Country Gardens Magazine, Spring 2011.

Many thanks to Country Gardens magazine, and James A. Baggett, Editor, for their interest in my vintage container and succulent designs. This article was produced by Andrea Caughey, and photographed by Ed Gohlich.

My Bullet Tips on Designing with Vintage Containers: -One of a kind, unique -Surprise element, usually through repurposing -Look for them at flea markets, garage sales, antique shops, online -Buckets, pails, chicken feeders, nests, vintage sewing drawers, oil cans, strainers -Vintage containers dictate your design by color, shape, character, and style -Allow for ample drainage, either with gravel or shells -Add gravel, then your potting soil; next place your bulbs, plants -Wood containers need to be lined with a heavy plastic first -Bulbs and succulents require little water, moist not wet, can use spray bottle

My Bullet Tips on Designing with Vintage Containers & Succulents -Design and plant tight areas using chop stick or knitting needle -Succulent designs lend themselves to small space requirements -Dense planting of succulents is best, less growth, and maintenance -Design ideas tips: 1) single color or tone but different form, 2) group with same shape, or 3) repeat same color tones

Please share if you have ever designed with vintage containers. Please comment on your favorite succulents.

The Farmstead Restaurant

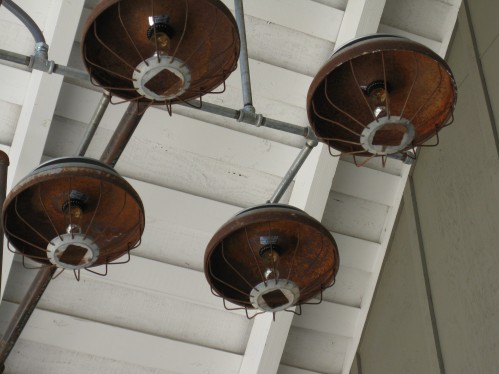
Vintage Chicken Feeder Light Fixture I want to share with you some of the exceptional places that I come across from time to time. These places are gems and not to be missed if you are in the area, or they could even be a destination. Most have a "garden thread" to them. "Places To Know" can be retail, restaurants, nurseries, and other. Whatever the place, expect the unusual. This is a first in a new category, "Places To Know"....

On a recent insider's trip to Napa with my garden gal's, The Farmstead Restaurant was a fabulous stop and restaurant on our itinerary. It is located at 738 Main Street in St. Helena, California 94574, (tel) 877-NAPA-OIL, or just south of St. Helena on the famous Highway 29 in Napa Valley.

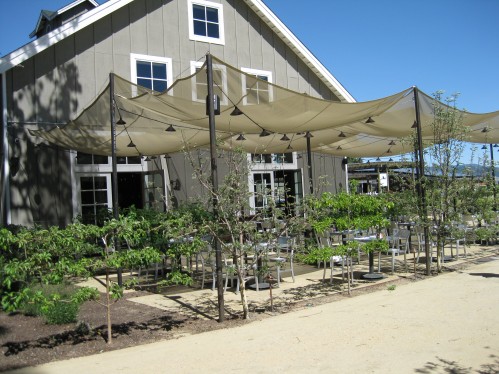
The restaurant is in a former nursery barn, transformed into a 110-seat restaurant featuring a farm-to-table menu, comprised of seasonal local, sustainable, and organic ingredients. It is a lively and social atmosphere. It was packed with diners the night we were there. Entering the restaurant, an outside light fixture created with vintage chicken feeders luminously greets you. I often use chicken feeders in vintage container design, but I have never thought about turning them into hanging lights. More unusual chandelier lighting hangs in the center of the restaurant made from re-purposed vintage-salvaged hay hooks from the owner's family historic ranch.

If you come for lunch at the Farmstead Restaurant, you might enjoy  intimate outdoor dining lined with living espaliered fruit trees, and an inviting nursery and demonstrating gardens, literally steps from your dining table. There is also on the grounds a wine and olive oil tasting room, too.

Espaliered Fruit Trees Perimeter Outdoor Dining Area

The Farmstead Restaurant is one part of a shining example of a vertical integration of a modern, organic, sustainable family farm which comprises Long Meadow Ranch. Long Meadow Ranch is owned by the dedicated Hall family. Their motto is "Excellence Through Responsible Farming." Long Meadow is a 650 acre historic ranch nestled high above Napa Valley in the Mayacamas Mountains. This property has old olive groves and vineyards originally planted in the 1870's. Thorough their sustainable philosophy and organic practices, Long Meadow Ranch make their own extra-virgin oil oil, world-class wines, raise their own grass-fed beef, grow their own heirloom vegetables, produce organic eggs, and more.

Long Meadow Ranch also includes LMR Rutherford Gardens, another historic property on the Napa Valley floor, and not far from The Farmstead Restaurant. Organic seasonal produce is grown for the the restaurant and the Friday St. Helen Farmer's Market. Soon, a farm stand featuring LMR's own produce, flowers, and eggs will be available each morning at The Farmstead Restaurant.

If you are visiting Napa Valley, I highly recommend stopping in for lunch or dinner at The Farmstead Restaurant. The food is delicious, the wines are lovely, and the atmosphere is inviting. Please comment if you are familiar with The Farmstead Restaurant and Long Meadow Ranch.

Design With Edibles

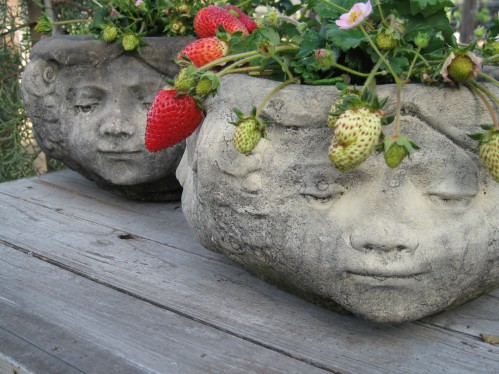
Crown of Strawberries I'm sure you have heard of a strawberry patch and a strawberry pot, but have you heard of a "crown of strawberries."  I have had this pair of cherub planters potted with bacopa and a few other trailing plants, but they really took on another look and life when I potted ornamental strawberry edibles in them. Imagine these planters placed on a table for a Sunday brunch.

There is something about using edibles in design, that transcends many styles such as cottage, country, eclectic, European, primitive, and even modern. It just works well. There is a bit of an element of surprise, that also pleases.

Decorative styling with edibles, is borrowing from the European potager kitchen garden concept, using flowers and vegetables intermingled, delivering function and beauty. Flowers and edibles are sensational together for floral designs, tabletop topiary, in the  garden, unusual containers, and where ever your imagination leads you.

Use live plants or  harvested fruit and vegetables to embrace this concept. Think of apples, asparagus, artichokes, green bananas, broccoli, cabbage, cranberries, gourds, lemons, kale, kumquats, oranges, pomegranates, strawberries, squash, and more.

First, your design starts with your container or location. What is it calling for. What form would look best. Is there a color combination that would be nice. Is there a plant combination that would surprise. Is there a function involved. What kind of creative ideas come to mind.

In the example of my two sweet cherub planters, I chose an ornamental strawberry plant, beautiful by itself. Deep green glossy leaves, bright pink flowers, emerging rouge-red ripening strawberries dangling like a crown, all add to its design drama and zeal. It has beauty. It is appealing.  It is growing edible fruit.

Please share if you design with edibles now. Please share some of your fun design combinations.

Vintage Container Design With Spring Bulbs

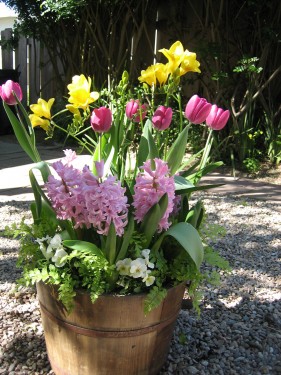
Bucket of Spring Bulbs With Easter in early April this year, you have time to create a special spring bulb arrangement in a great vintage container for your front door or patio. In the photo to the left, I created my spring bulb arrangement in a vintage wooden bucket. A simple container that lets its contents have the attention.

You can either start with various dormant bulbs, or if pressed for time you can purchase from nurseries ready-to-bloom spring tulips, daffodils, hyacinth, freesias, amaryllis, lilies, and more. Try mixing in ferns for softness, or perhaps some dainty violas. Remember, spring is just around the corner.

A few tips to help you plant a fabulous spring bulb arrangement: 1) Select your container, preferably one with a nice wide mouth or planting area. Let your container size, color, and shape dictate what bulbs and plants would look best.

2) Be aware of your "plant-to-bloom" time frame, so that you coincide your arrangement in full bloom to your time frame needed. Perhaps, you might even want to stagger different bulbs to bloom at various times, for a longer lasting arrangement.

3) Dormant bulbs are awakened by the sun. Once your arrangement is planted, keep your arrangement in a sunny spot. Bulbs like to be on the dry side or moist, but not wet. Plant your bulbs root-side down. Arrange your bulbs in a good all-purpose potting soil, and allow for proper drainage. If you do not have drainage holes, line your container with heavy black plastic, and water sparingly. Save your spent bulbs from your arrangement, and plant in your garden.

4) Forced branches from your garden or market are beautiful this time of year, too, and are excellent companions to spring bulbs. Have fun with these beautiful pliable branches by shaping them, creating forms for support, and using them as structure.

Please share how you announce and herald spring at your home? Please comment on your favorite spring bulbs? Is it daffodils? hyacinth?