Jennifer Rebecca Iris Blooming
Pink Cistus Rockrose
Happy Wisteria
Sally Holmes Rose Draped Over St. Francis
Flowering Herbs
Sunset Over A Spring Garden and Awakening Vineyard
Bon Appétit et Bon Weekend….Bonnie

Jennifer Rebecca Iris Blooming
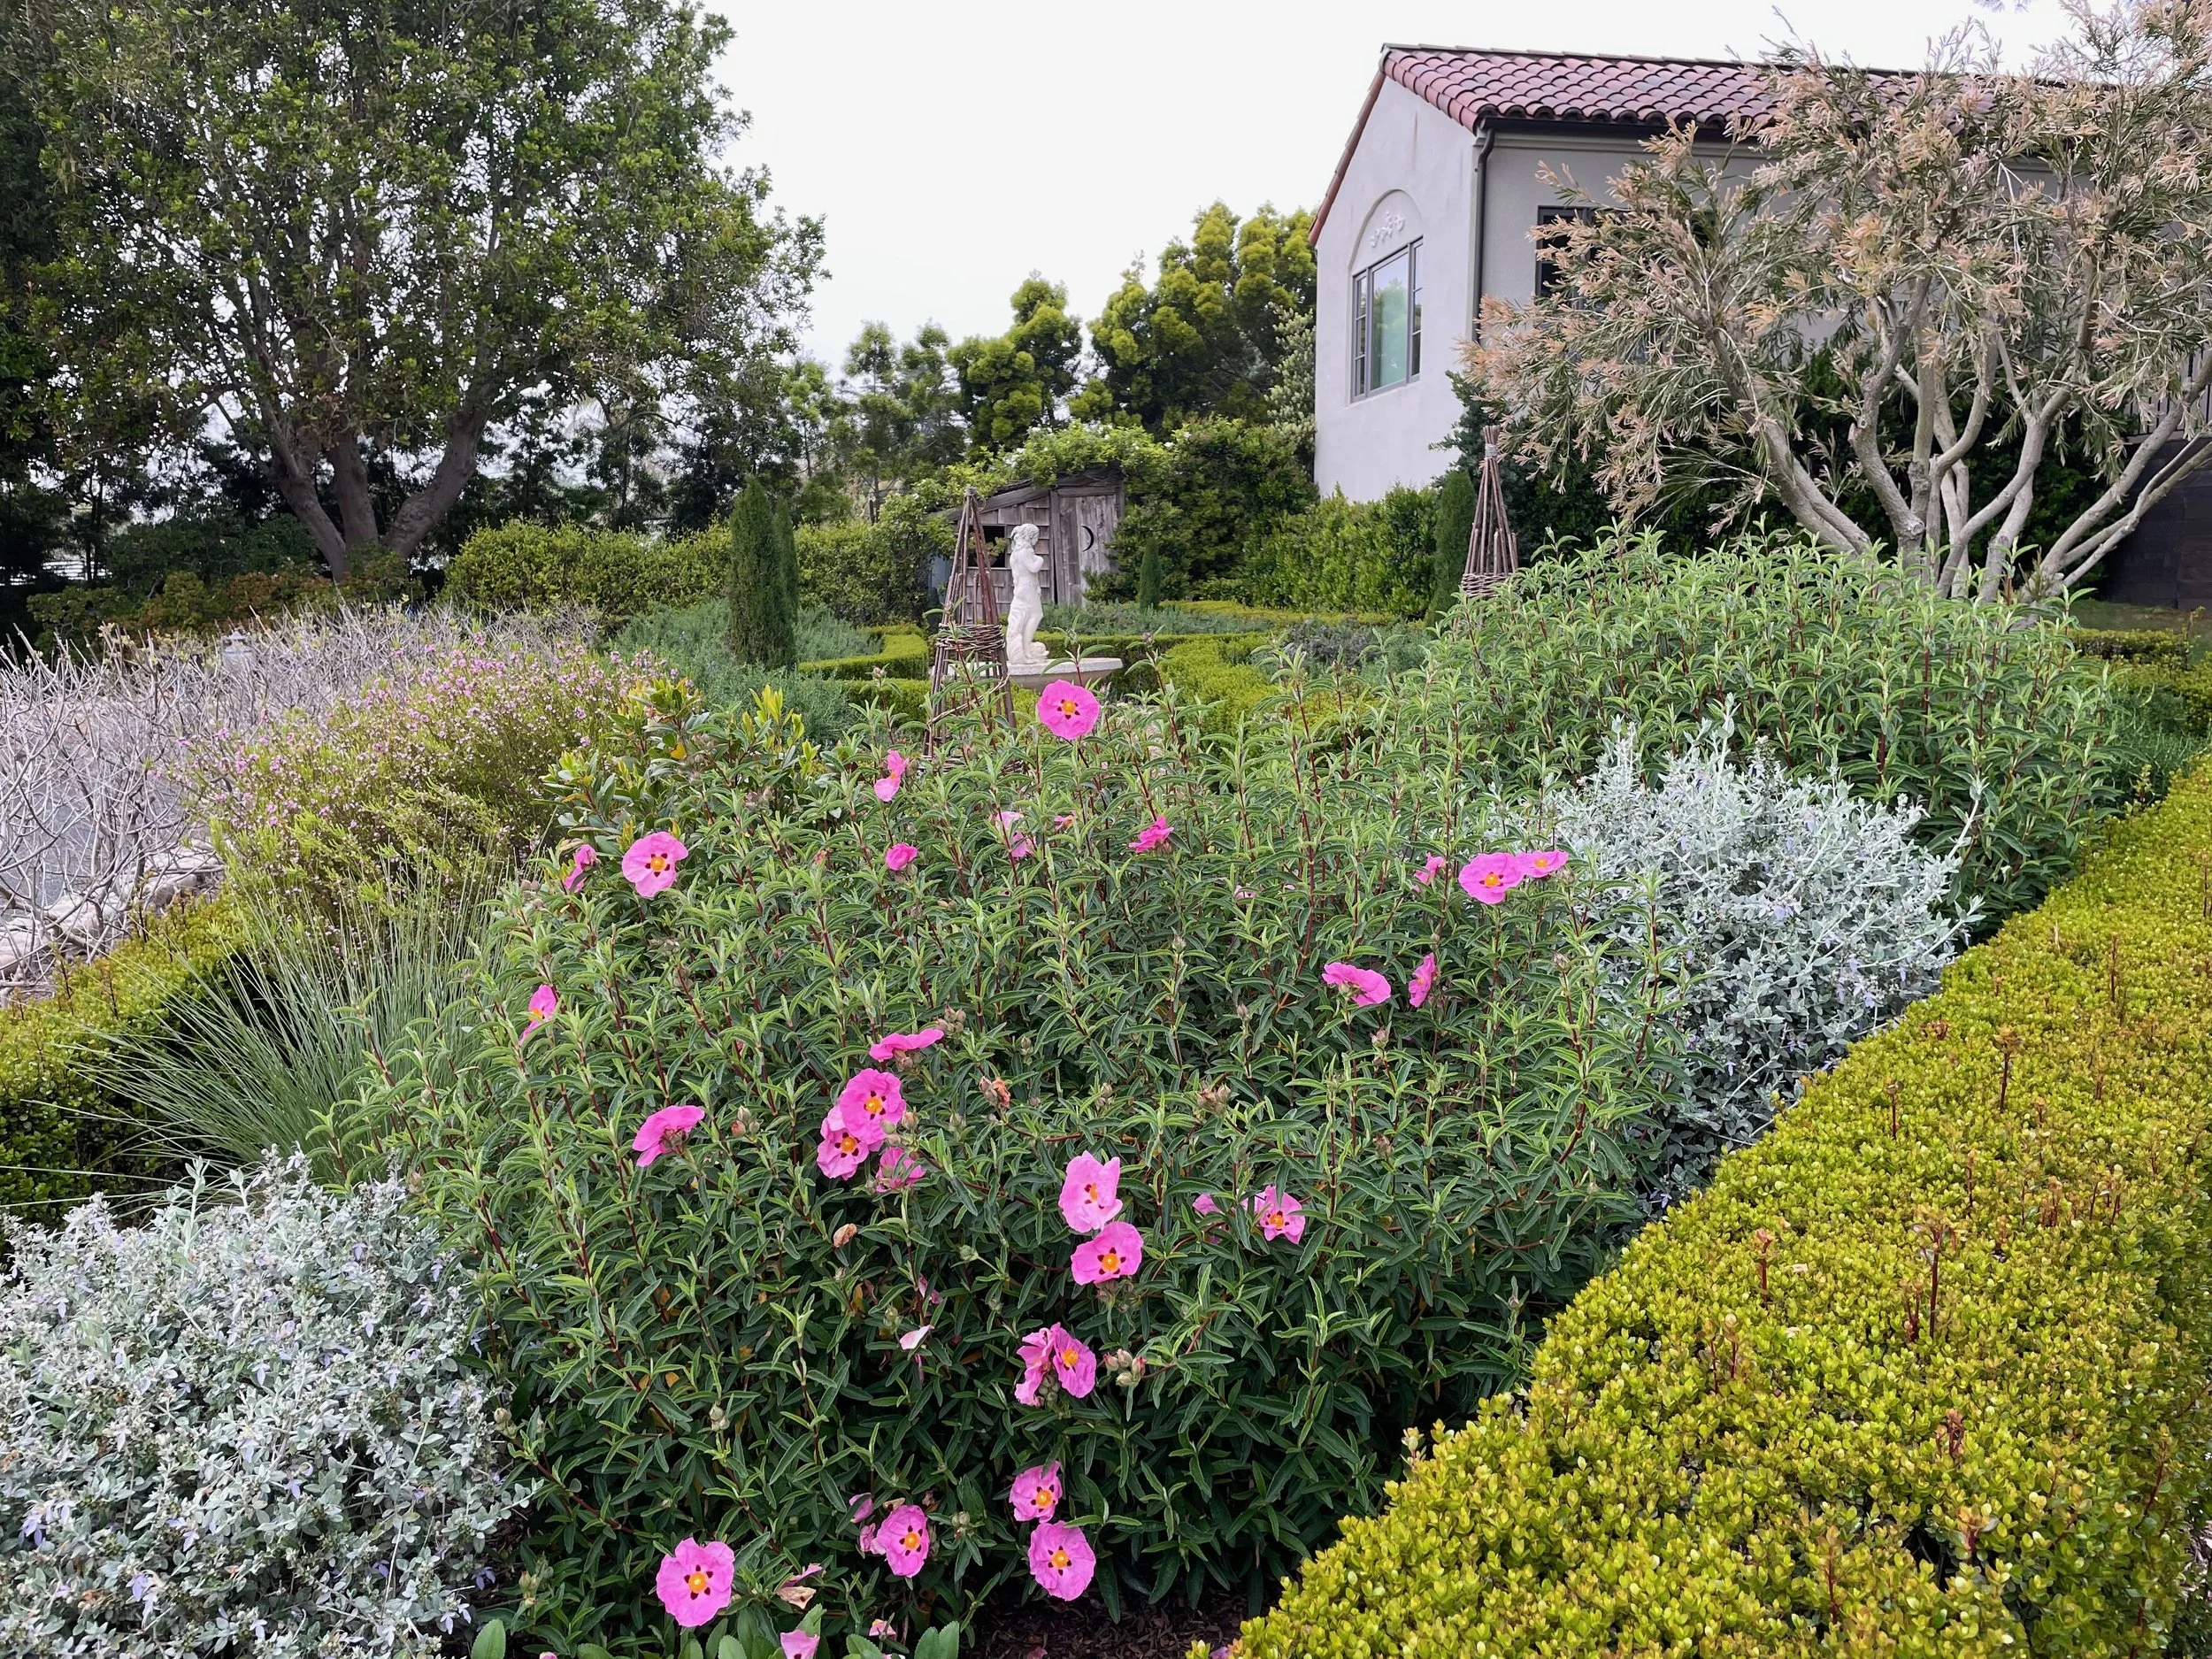
Pink Cistus Rockrose

Happy Wisteria

Sally Holmes Rose Draped Over St. Francis

Flowering Herbs

Sunset Over A Spring Garden and Awakening Vineyard
Bon Appétit et Bon Weekend….Bonnie

The Kitchen Garden at Allt-y-bela in Wales, Garden Design 2012 Magazine
From my post last week, Down The Garden Path, followers were asking me where I got my willow fencing. I thought it might be fun to revisit the original post from June 2021, and my original kitchen garden inspiration from photos and the Garden Design article. I hunted “high’ and “low” to find willow products, and finally found them at Master Garden Products in the Pacific Northwest. I actually called them as I had several questions and needed more information to make my order. Master Garden Products couldn’t have been more helpful and so friendly. I highly recommend the company and their products.
Now is a great time to get your gardens plans in place, make an order, and enjoy the beauty of willow!
Bon Appétit et Bon Weekend…Bonnie
The inspiration for my kitchen garden, or potager, came from a Garden Design, Winter 2012 magazine article, Simplicity Rules, on well-known garden designer, Arne Maynard’s rustic and historic late medieval farm, Allt-y-bella. Located in Wales, much of the rustic gardens and garden structure remind me of Provence. I envisioned borrowing a lot of the main elements featured in the article and photos, creating the look of a rustic kitchen garden. Some of these elements that caught my interest were the wattle hazel fencing, arching fruit trees with a centered bench, raised beds for vegetables, obelisks for climbing vegetables, easy pathways around the raised beds, and select spots for larger perennial plants like rhubarb and artichokes.
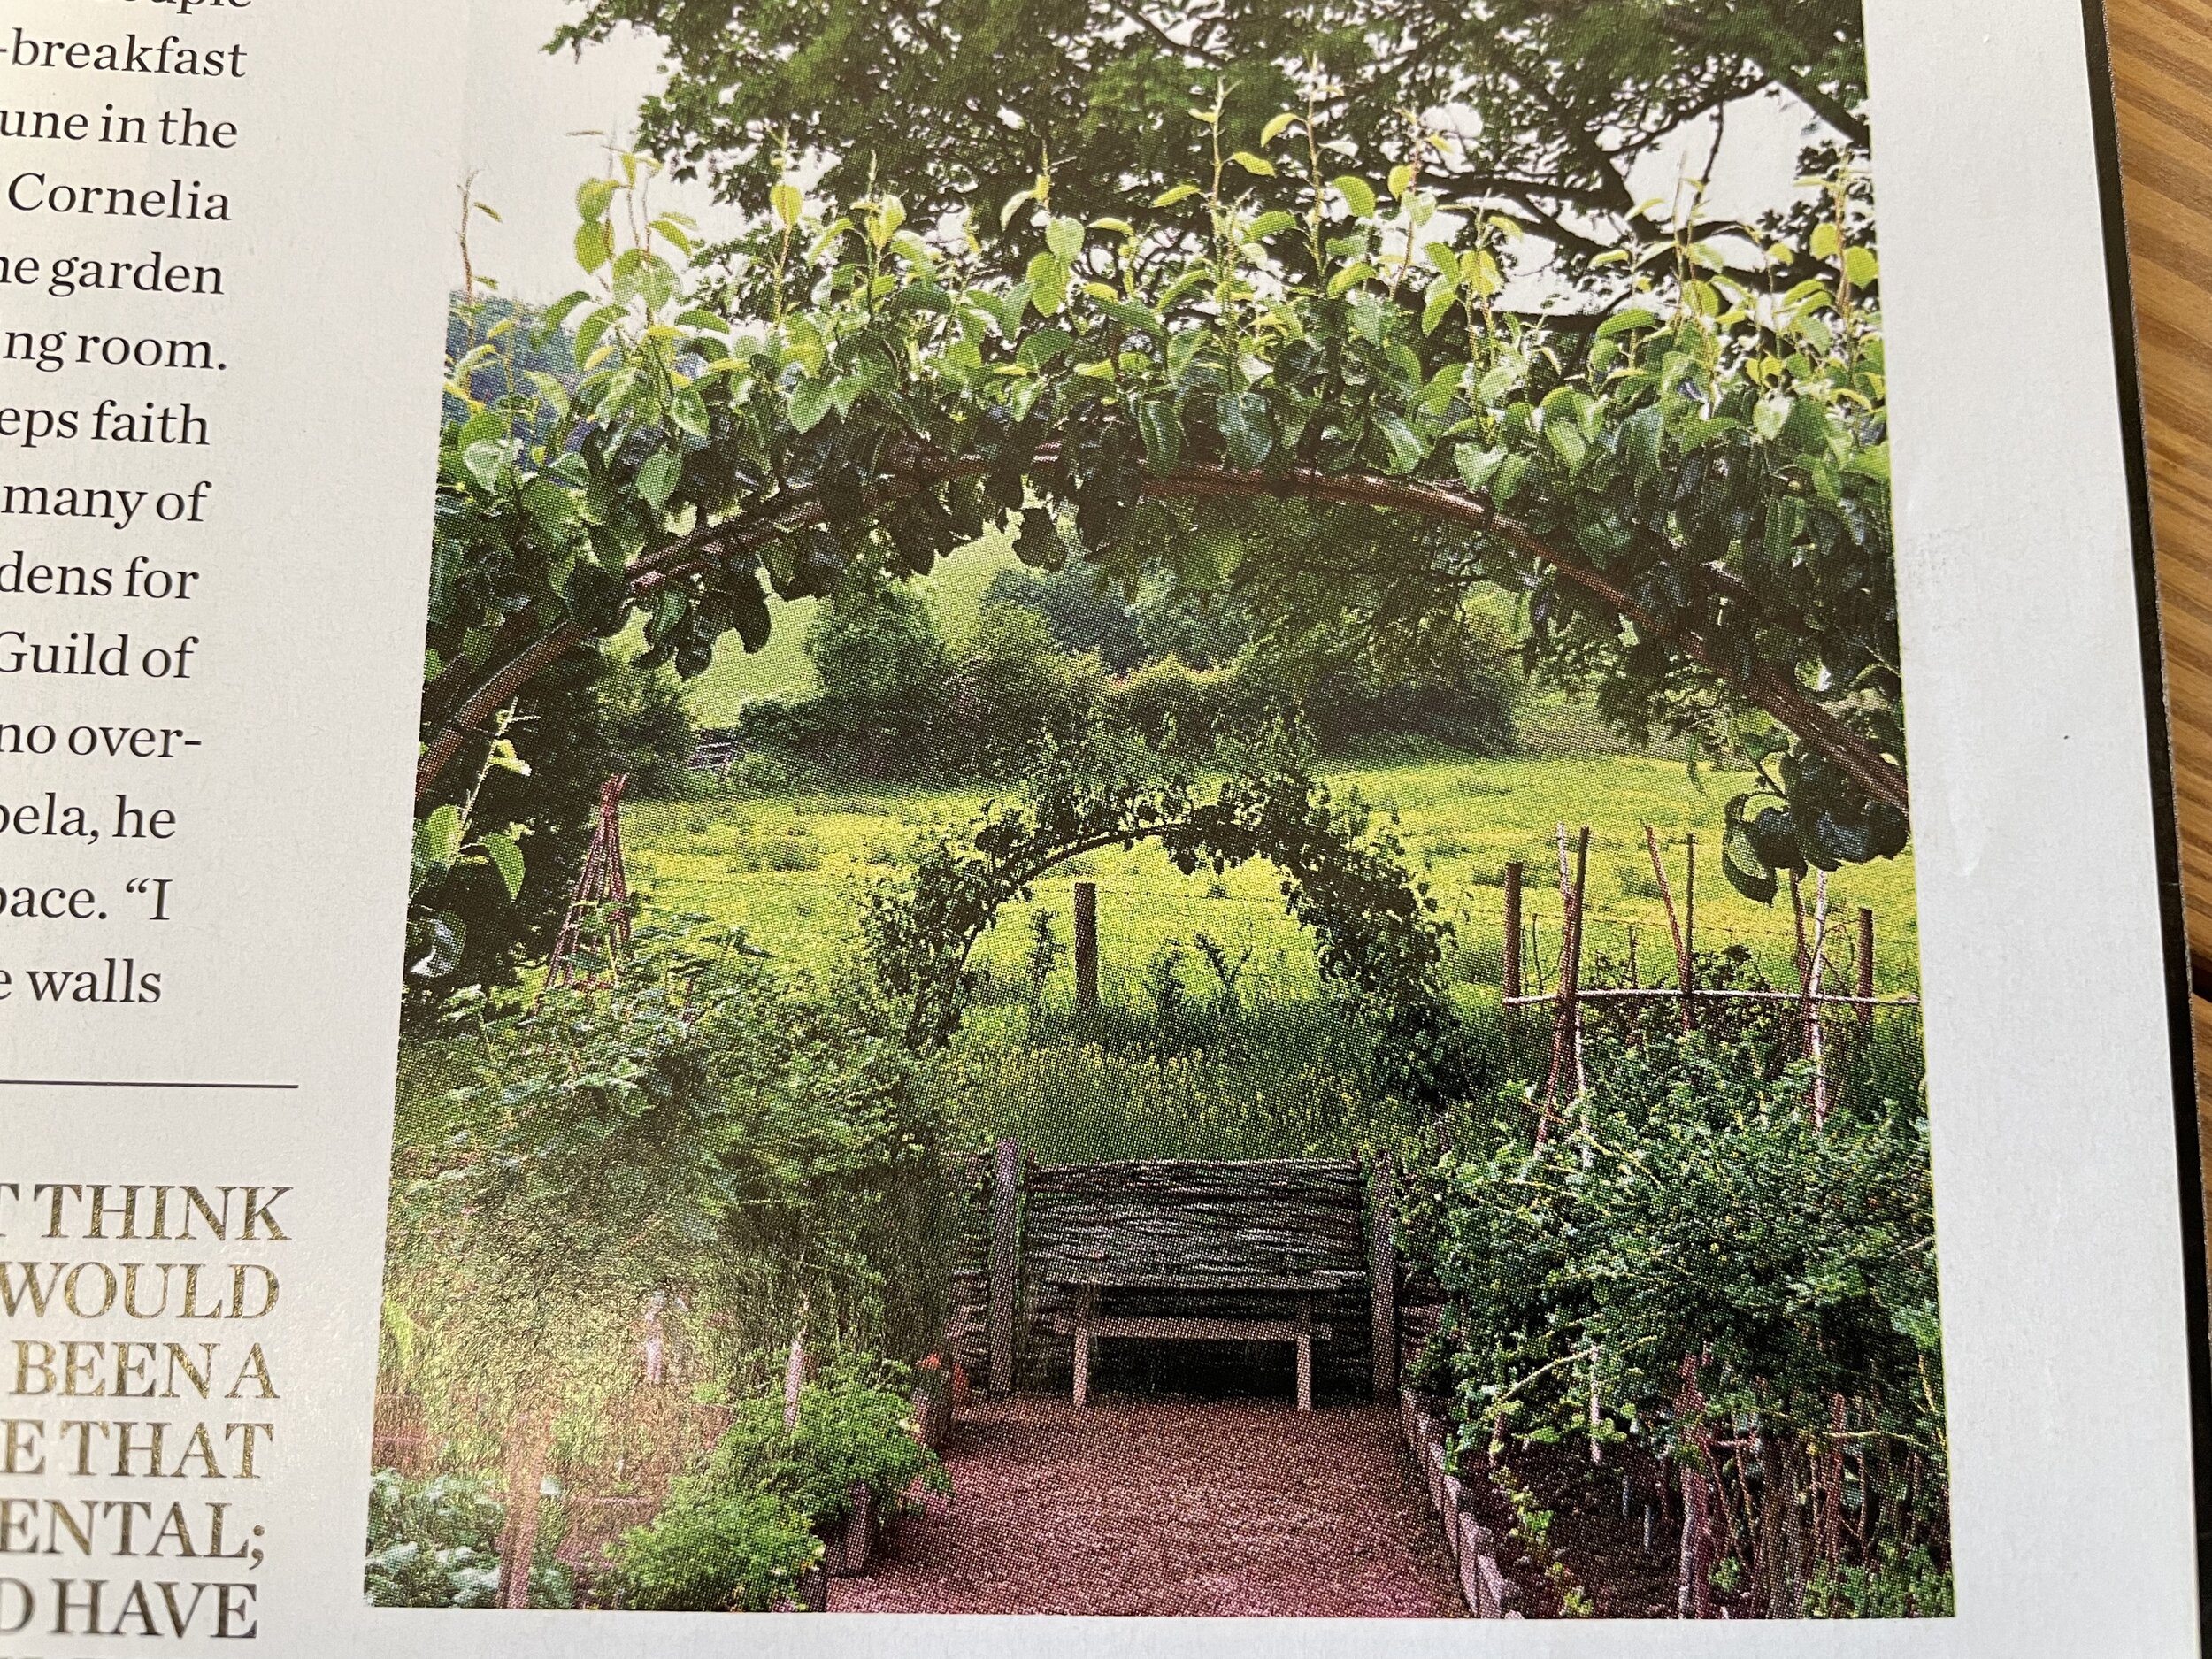
Allt-y-bela Kitchen Garden Pathway, Arching Fruit Trees, and Bench, Garden Design 2012
In 2015, I started creating a kitchen garden space to the north of our vineyard, with 4’ x 8’ raised bed kits. I looked high and low for hazel or willow wattle fencing for enclosing the kitchen garden similar to Allt-y-bella. I couldn’t find any source at the time. I needed about 75’ total. However, I happened to find a large amount of rolled willow fencing at Rogers Gardens at 50% off in an obscure sale corner. My intention for fencing the perimeter was to keep our chickens out of the kitchen garden as well as any random critters.
Up until 2020, my kitchen garden was good, and a work in progress. Over time, with sun exposure and high winter winds the willow fencing began to come apart and break down. This is common. I started looking for what I call wattle or willow fencing again.

My Kitchen Garden, June 2020
Last month I found willow fence panels online at Master Garden Products. They offer a nice selection and sizes of willow fencing, panels, borders, obelisks, etc. They are out of the Seattle area, and will freight orders to you. I purchased 6’ L x 3’ H woven panels for my entire perimeter, and used the same anchoring rebar and metal stakes that were already in place. I am really pleased with the look, and the material overall. I also purchased three obelisks for climbing beans. The willow panels are stronger and sturdier than the rolled fencing, but will eventually break down over time.

My Kitchen Garden, May 2021
Fine tuning the willow fence, I will put put larger rocks around the bottom of the fencing, to discourage critters from burrowing under the fence.

Starting an Outside Row of Perennial Artichokes
For more information and musing on how I create garden rooms from garden magazines, photos, and design ideas, please go to my previous post, The Making of a Garden Room.
French Fabulous! On Netflix, there is a new French subtitled drama series, Lupin. It is like a modern day “Houdini” Thriller series. Lots of twists and turns. Not only does it keep you on the edge, it is filmed mainly in beautiful Paris. Once you watch an episode or two, it draws you like a magnet. With two series completed, I see there is a third one coming.
Bon Appétit and Bon Weekend….Bonnie

Dark Chocolate Tart
Show Mom the love by baking her this “Dark Chocolate Tart” for Mother’s Day! Easy to make, key is using the best bittersweet chocolate you can find. I use Guittard bittersweet chocolate (74% cacao) in bars.
This is Ina Garten’s recipe in her Go-To Dinners, inspired by Erin French’s The Lost Kitchen cookbook. I have lovingly adapted it a bit more. This recipe is a simple graham cracker crust with a chocolate mousse filling and a chocolate ganache topping glaze, lightly sprinkled with flaky sea salt, such as Maldon. For serving, garnish each serving with a sprig of fresh mint or a few raspberries. A truly luxurious chocolate dessert, perfect for Mom on her special day!
The recipe calls for Nabisco chocolate wafers, which are sometimes hard to find. I found at Trader Joe’s a 16-ounce package of cinnamon graham crackers (in their cookie section) that I substitute 9 ounces in for the crust, and it is a lovely addition. These cinnamon graham crackers grind well in a food processor.
For the crust:
1 (9-ounce) box Nabisco chocolate wafers
¼ cup sugar
6 tablespoons unsalted butter, melted
For the filling:
1 cup bittersweet chocolate, finely chopped (6½ ounces) (see note)
1¼ cups heavy cream
2 extra-large eggs, lightly beaten
1 teaspoon pure vanilla extract
For the glaze:
½ cup bittersweet chocolate, finely chopped (3 ounces)
¼ cup heavy cream
¼ teaspoon coffee granules
½ teaspoon flaked sea salt, such as Maldon
Preheat the oven to 350 degrees.
Place the chocolate wafers and sugar in the bowl of a food processor fitted with the steel blade and process until finely ground. Pour the mixture into a bowl, add the butter, and mix until well incorporated. Press the mixture into the bottom and sides of a 9-inch tart pan with a removable bottom. Place on a sheet pan and bake for 10 minutes. Set aside.
Meanwhile, for the filing, place the 1 cup of chocolate in a medium glass bowl. Heat the cream until it just comes to a boil. Pour the cream over the chocolate, allow it to sit for 1 minute, then stir gently with a whisk until smooth (see note). Stir the eggs and vanilla into the chocolate until smooth and pour into the tart shell. Bake for 18 to 20 minutes, until the chocolate is set on the edges but still jiggly in the middle. Set aside to cool.
For the glaze, put the ½ cup chocolate and the coffee in a glass bowl. Heat the cream to simmering and pour it over the chocolate. Let sit for 1 minute, then whisk until smooth. Gently pour over the chocolate filling (not the crust) and spread to the inside edge of the crust with a knife or offset spatula. Sprinkle with the salt and set aside at room temperature until set. Remove the rim of the tart pan and place the tart on a flat serving plate. Cut in wedges (don’t worry if the crust crumbles) and serve at room temperature.
Notes:
If either chocolate & cream mixture doesn’t melt completely, heat in a microwave for 15 seconds.
Bon Appétit, Bon Weekend, and Happy Mother’s Day…Bonnie
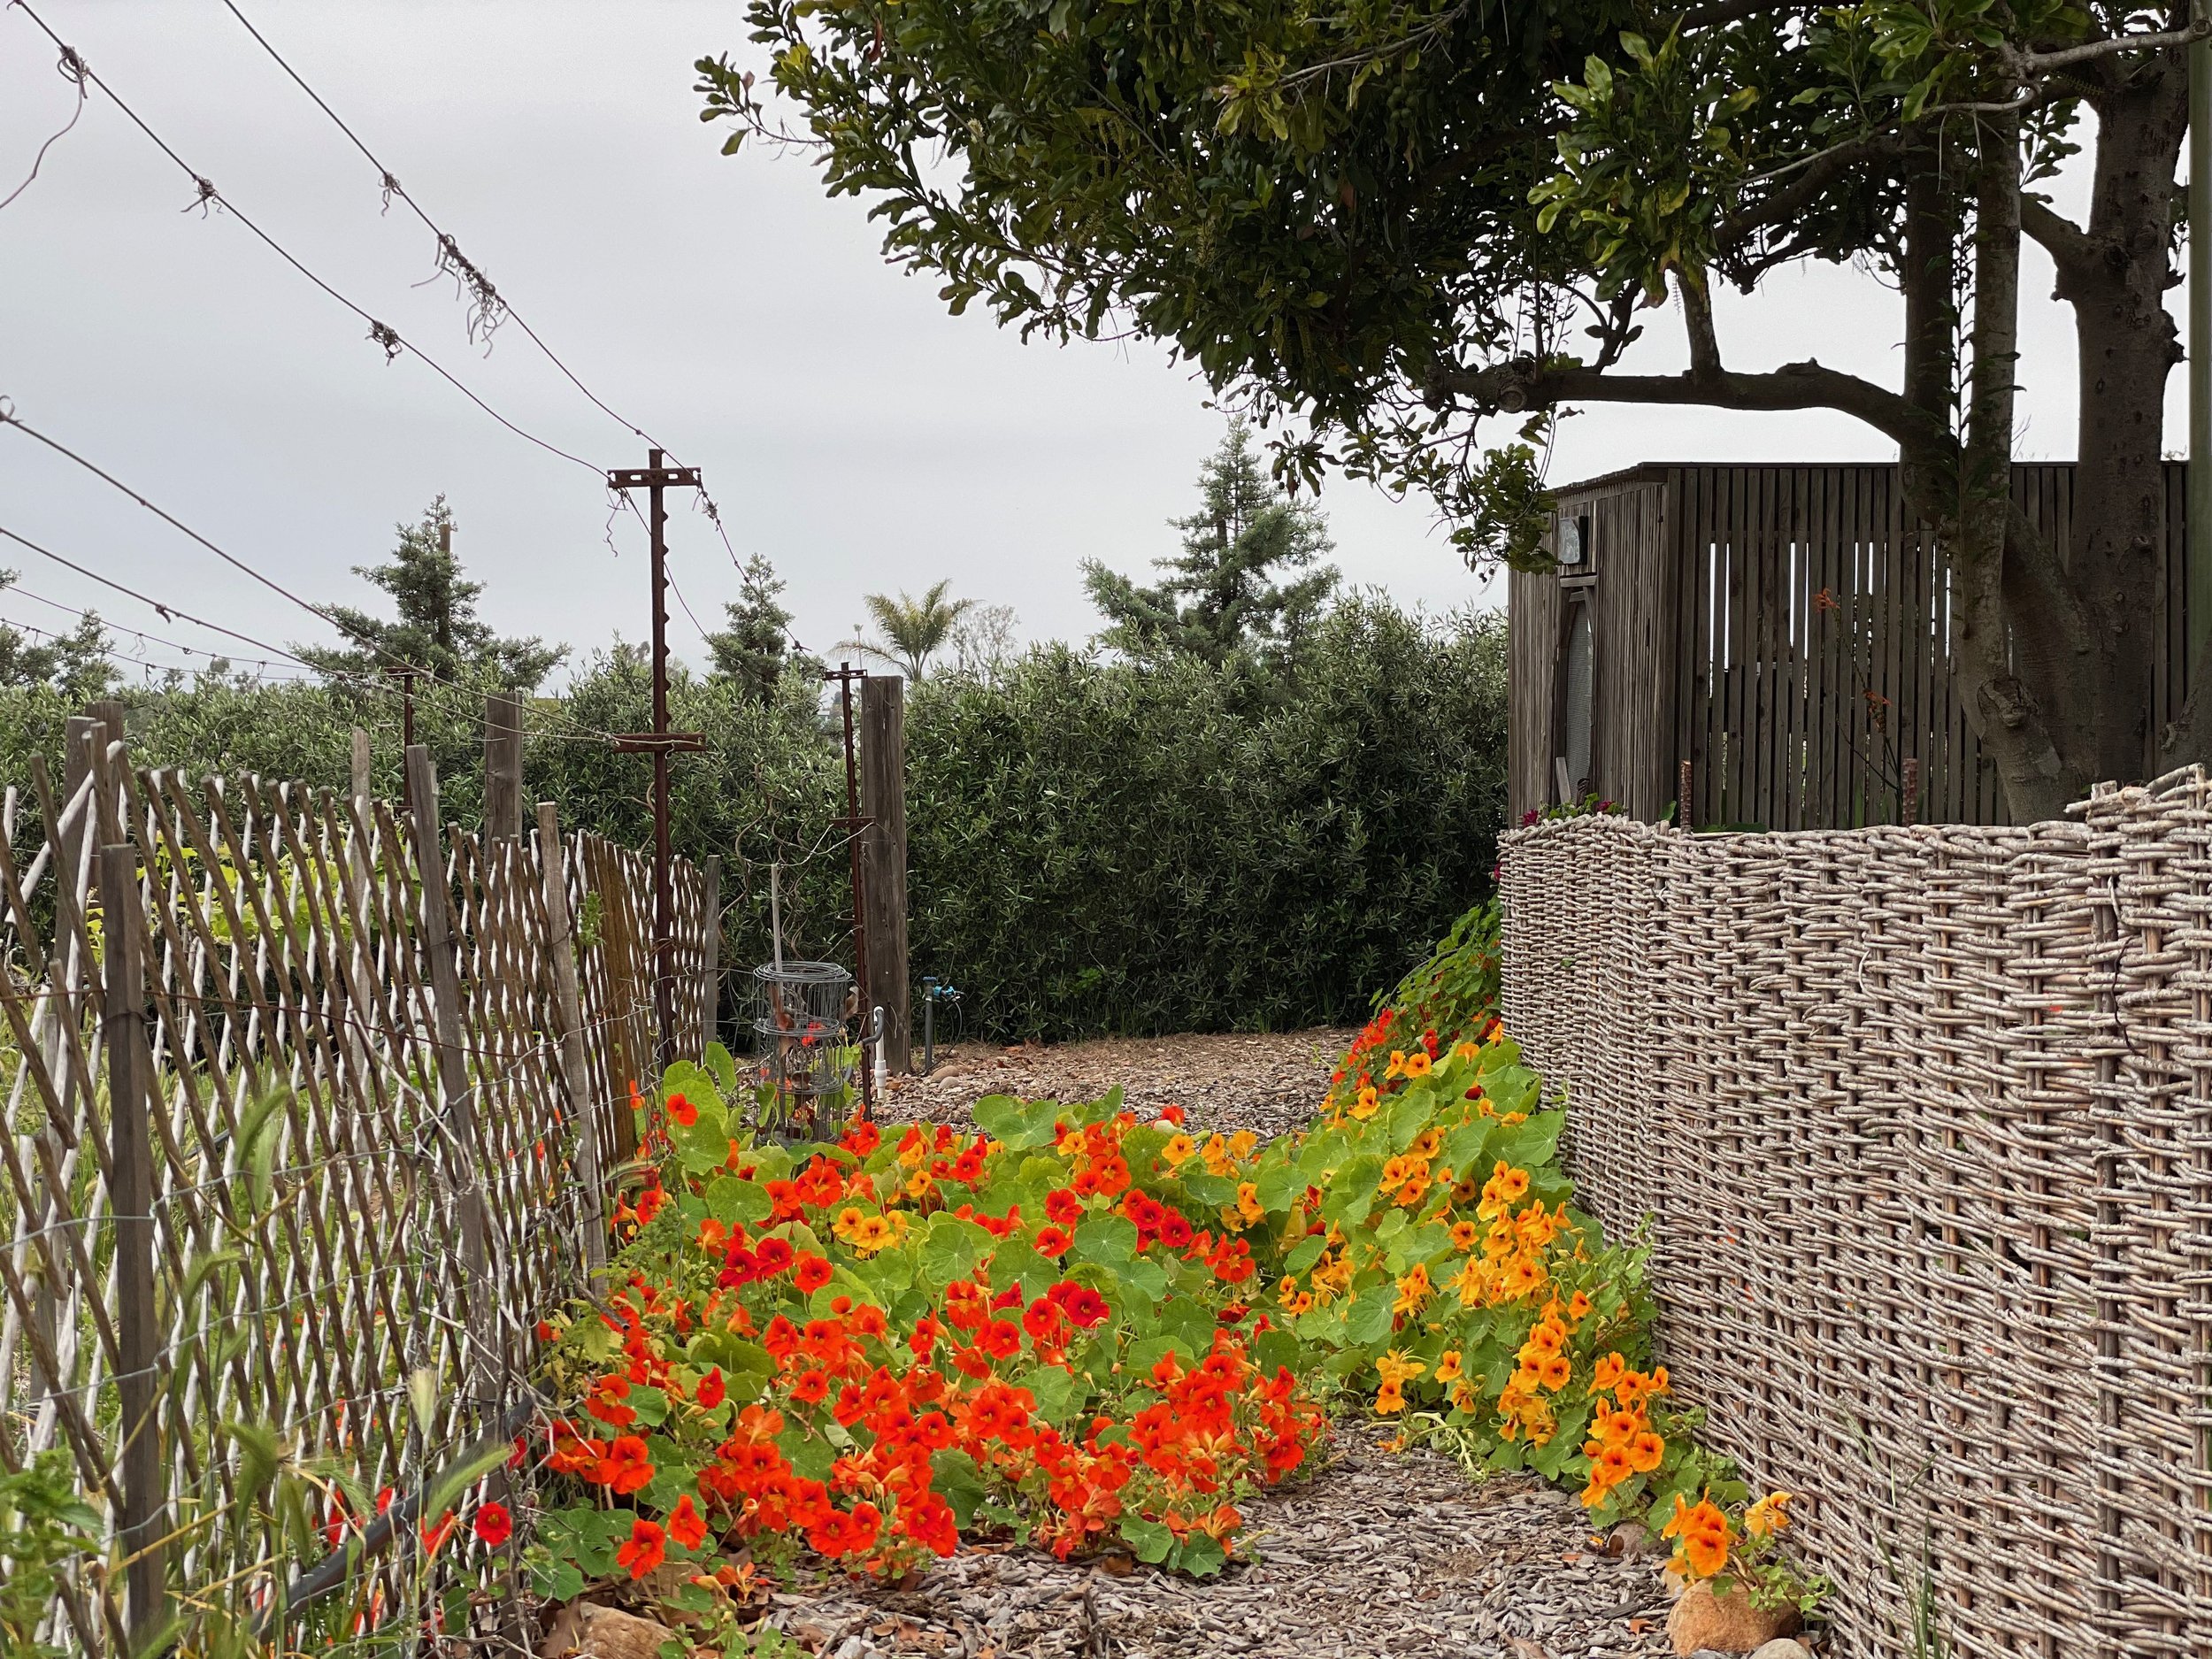
Nasturtium Spilling Onto the Garden Path
The best path is your path. Follow your own garden path.
Bon Appétit et Bon Weekend…Bonnie

Glazed Lemon-Blueberry Poppyseed Bundt Cake
This is a great bundt cake for spring featuring lemon, blueberries, and poppyseed. In fact, it can rise to a special occasion such as Easter Brunch. Easy to make, not too sweet, yet lots of flavor. I love lemon flavor in a spring cake, and this recipe has fresh lemon juice in the cake and glaze, as well as lemon extract in the cake. Sometimes bundt cakes stick coming out of the pan, but this recipe slips out of the pan easily.
Lovingly Adapted from David Bonom, Cooking Light, April 2009
Ingredient Checklist
Cake:
Cooking spray
1 ½ tablespoons dry breadcrumbs
1 ¾ cups granulated sugar
¾ cup butter, softened
4 large eggs
13 ¾ ounces all-purpose flour (about 3 cups)
1 tablespoon baking powder
1 tablespoon poppy seeds
½ teaspoon baking soda
½ teaspoon salt
1 ½ cups fresh blueberries
¾ cup nonfat buttermilk
⅓ cup fresh lemon juice (about 3 lemons)
1 teaspoon vanilla extract
1 teaspoon lemon extract
Glaze:
1 cup powdered sugar
1 tablespoon nonfat buttermilk
1 tablespoon fresh lemon juice
Instructions Checklist
Step 1
Preheat the oven to 350°.
Step 2
To prepare cake, coat a 12-cup Bundt pan with cooking spray; dust with breadcrumbs.
Step 3
Combine granulated sugar and butter in a large bowl; beat with a mixer at medium speed until light and fluffy (about 5 minutes). Add eggs, one at a time, beating well after each addition. Weigh or lightly spoon flour into dry measuring cups; level with a knife. Combine flour and next 4 ingredients (through salt); stir with a whisk. Add blueberries to flour mixture; toss to coat. Combine 3/4 cup buttermilk, 1/3 cup juice, and extracts. Add flour mixture and buttermilk mixture alternately to sugar mixture, beginning and ending with flour mixture. Pour batter into prepared pan.
Step 4
Bake at 350° for 45 minutes or until a wooden pick inserted in center comes out clean. Cool pan on a wire rack 10 minutes. Remove cake from pan; cool on rack.
Step 5
To prepare glaze, place powdered sugar in a small bowl; add 1 tablespoon buttermilk and 1 tablespoon juice, stirring with a whisk until combined. Pour glaze over warm cake; cool completely.

Glazed Lemon-Blueberry Poppyseed Cake For Spring
Bon Appétit et Bon Weekend…Bonnie

De Niro Pasta
Yes, the name of this recipe is De Niro Pasta, just like brilliant actor, Robert De Niro. It is not his pasta recipe, only the names are similar. This recipe was found online at Cooking Professionally. In fact, I could also name this recipe, Pantry Pasta. It is so easy, so delicious, and most of the ingredients, except the lean ground beef can be in your pantry full time. It has a nice spice and flavor structure highlighted with saffron threads. One could even leave out the lean ground beef, and it still is a wonderfully delicious dish. Key here is, you have got to like olives and capers, or you are not going to enjoy it.
This is a perfect weekday dinner now, when spring is approaching and it is warm during the day, yet cool at night, and comfort food still beckons. Serve it with a nice mixed green vinaigrette salad and a generous slice of rustic bread. Enjoy!
8 ounces thin spaghetti
1 tablespoon olive oil
2 cups onion, chopped
2 teaspoons garlic, minced
1 teaspoon dried oregano
1/2 teaspoon celery salt
1/4 teaspoon crushed red pepper
1/4 teaspoon freshly ground black pepper
1/4 teaspoon saffron threads, optional, crushed
8 ounces extra-lean ground beef
1 2/3 cups low-sodium marinara sauce
2 ounces pimiento-stuffed olives, sliced
1/4 cup dry sherry
1 tablespoon capers
4 tablespoons fresh parsley, chopped
Step 1 -In a large pot of salted water, cook the pasta to al dente according to the package directions.
Step 2 -In a large skillet over medium-high heat, warm the oil.
Step 3 -Add the onion to the oil and sauté until tender, about 4 minutes.
Step 4 -Add the garlic to the onion and sauté until fragrant, about 1 minute.
Step 5 -Stir the oregano, the celery salt, the red pepper, the black pepper, and the saffron into the onion mixture.
Step 6 -Add the beef to the onion mixture and cook, stirring to crumble, until the meat is no longer pink, about 5-7 minutes.
Step 7 -Stir the marinara sauce, the olives, the sherry, the capers, and 3 tablespoons of the parsley into the meat mixture.
Step 8 -Bring the sauce to a boil, reduce the heat, and simmer for 15 minutes.
Step 9 -Add the cooked pasta to the sauce mixture and cook until heated through, about 2 minutes.
Step 10 -Sprinkle with the remaining parsley and serve.
Cook, Bake, and Celebrate Spring Flavors
Hosted at Domaine de Manion, Encinitas, California
Saturday, April 29, 2023 at 11am to 3pm
$195.00 per person
Class Size is Limited to First 8 Guests
Lemon Tarragon Deviled Eggs
Spring Pea Salad with Mint, Chile, and Ricotta Salata
Lamb & Ricotta Meatballs
Rosemary Hummus
Mint Chutney
Carlton Bakery’s Lemon Tart

Carlton Bakery Lemon Tart
To Sign Up, and for Further Details
Please contact Bonnie, bonnie@vintagegardengal.com, (tel) (760) 402-7600
This cooking class is “hands on,” followed by a sit down luncheon, à table, enjoying the recipes we have made together. A minimum of 6 guests is necessary for the cooking class to be held. Seasonal menu can be subject to change and substitution.
A portion of your class fee will be donated to Chef José Andrés, World Central Kitchen, a non-governmental organization dedicated to worldwide humanitarian relief through food.
Bon Appétit et Bon Weekend….Bonnie
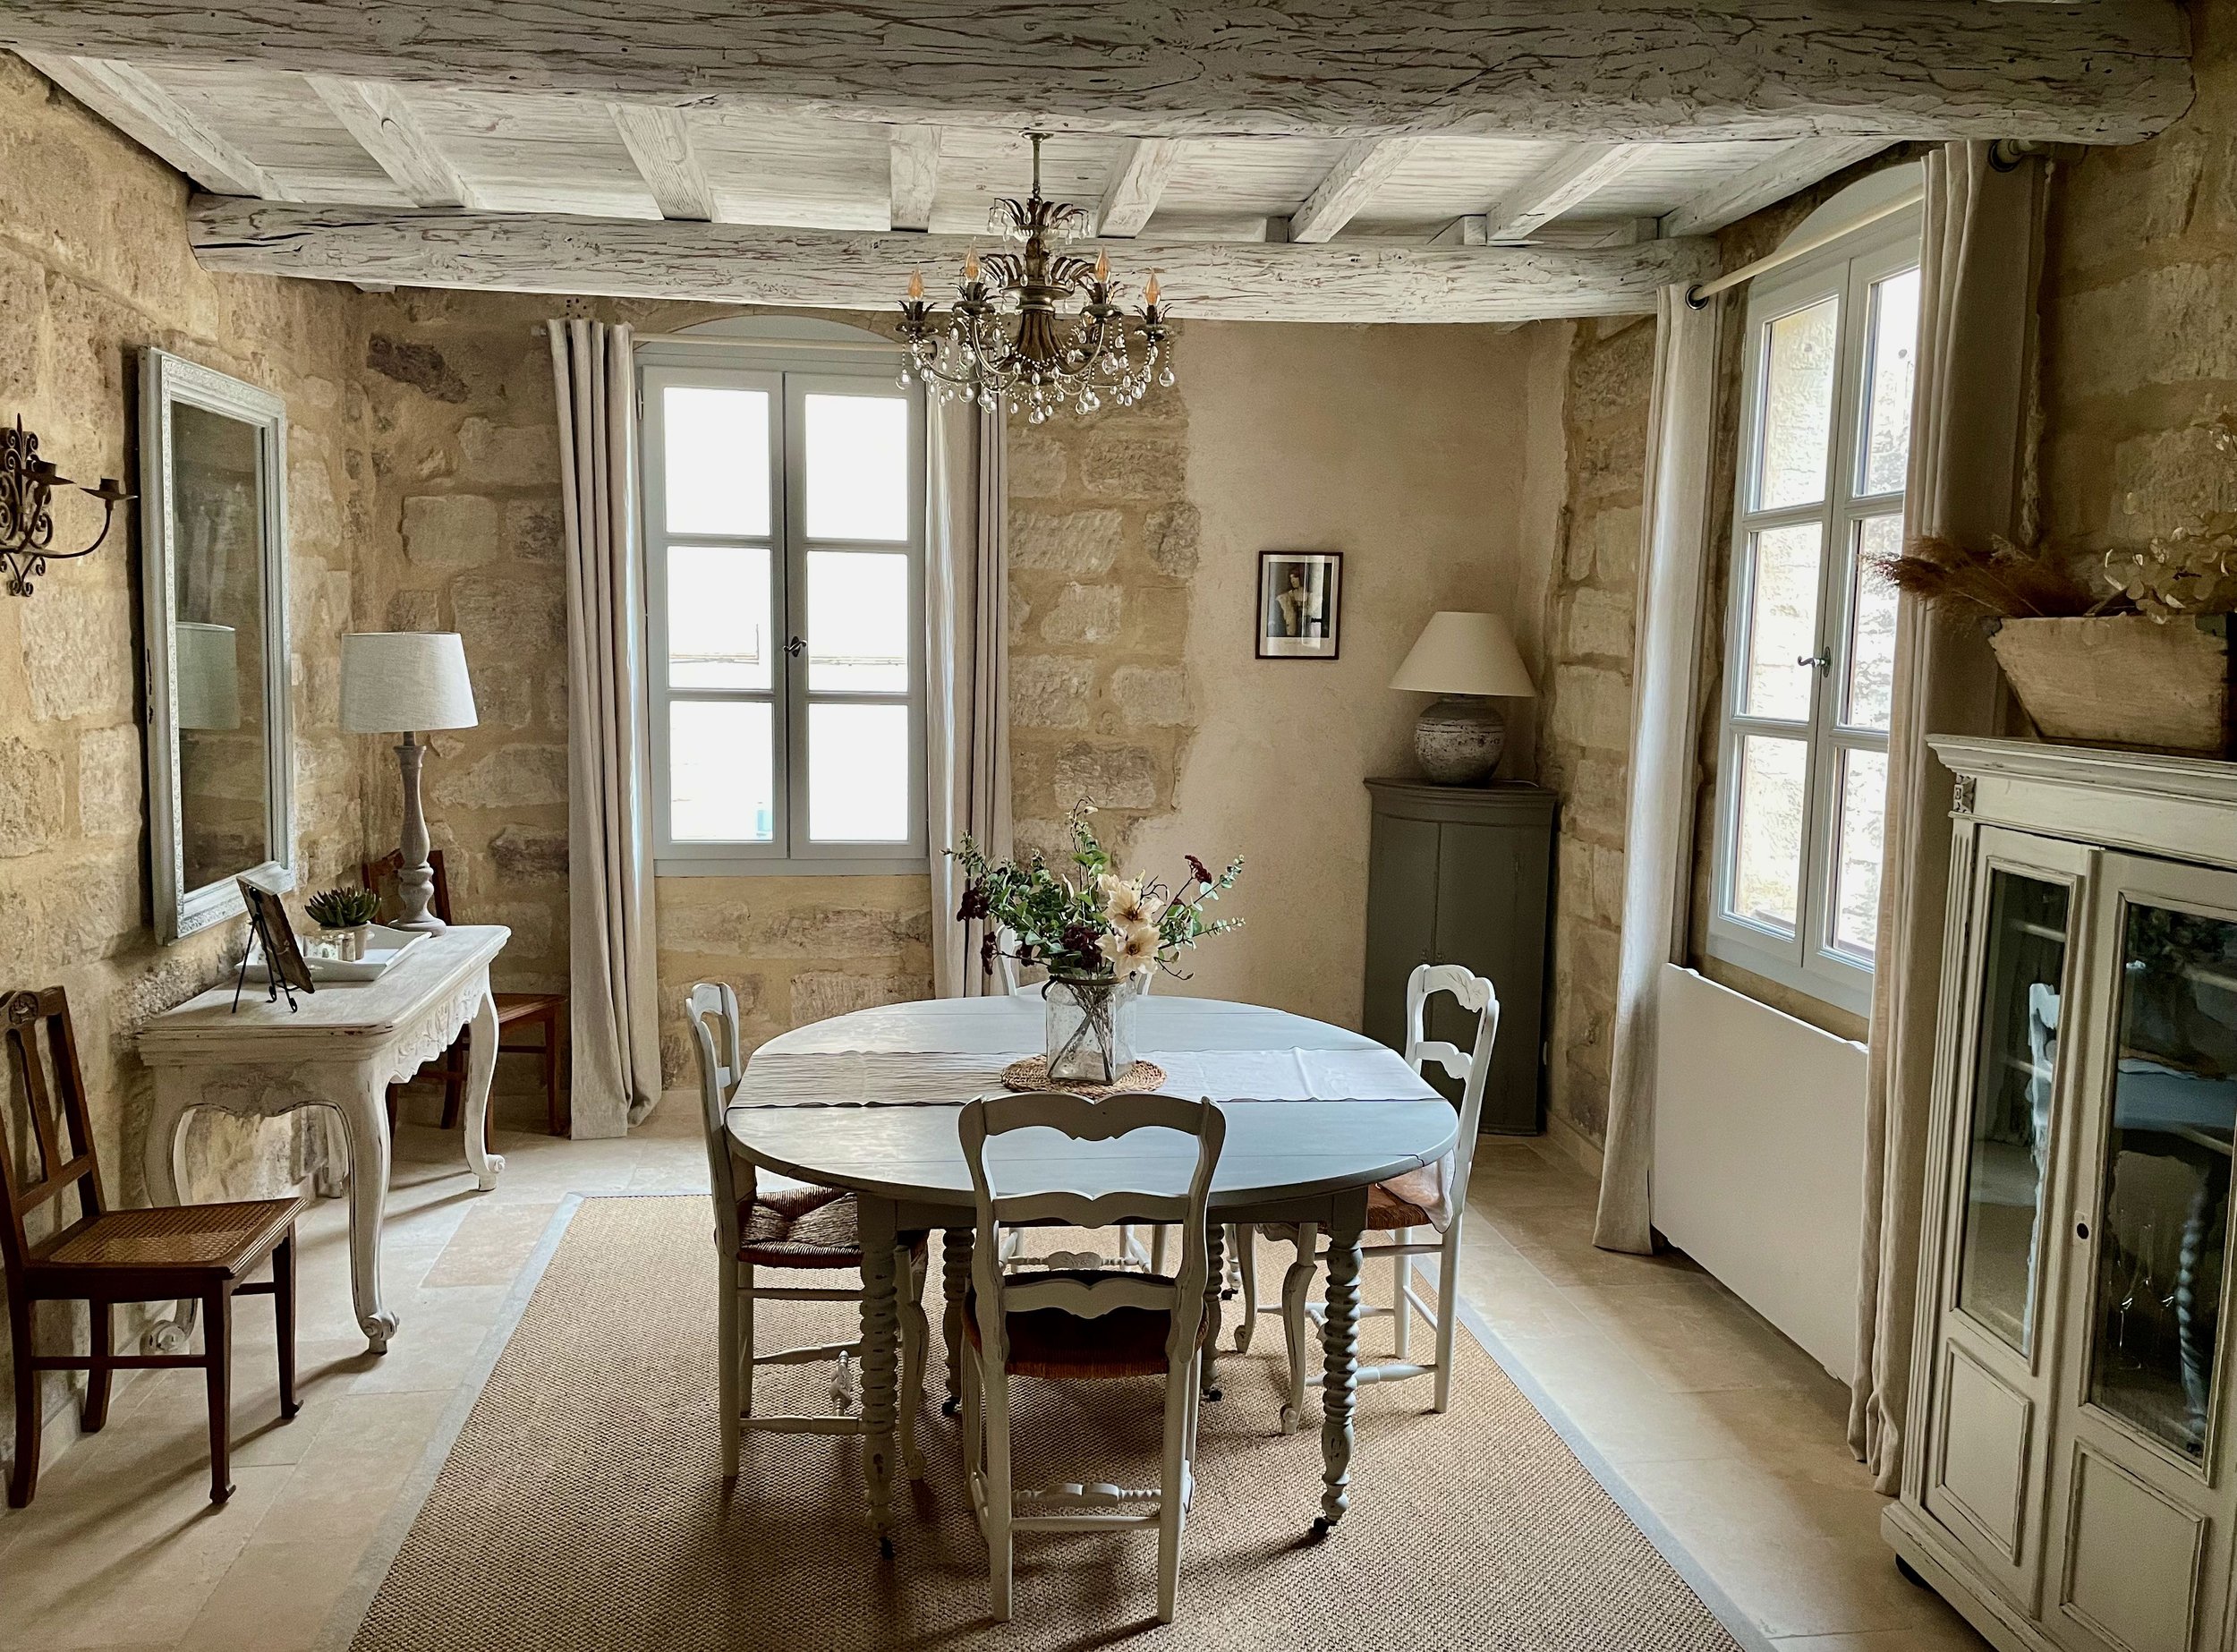
Dreamy Dining Room
My husband and I rented a beautiful two bedroom apartment in the historic center of Uzès, South France. This apartment is within walking distance of everything, so convenient, so relaxing, and so inviting. If you ever get a chance to visit this charming town, plan on staying a few days.
We found this stunning apartment on AirBnB, called C’est la Vie, managed by Dominique and Christophe Cachat. She is American, and he is French. Dominique loves remodel, decorating projects, brocante finds, and it shows. They offer a number of properties to rent in the area which can accommodate a number of guests. Their website is www.uzesvacationrentals.com

Dreamy Kitchen
The kitchen all on one side, and all in white, has everything, even a dishwasher. I must admit we ate out most evenings, at wonderful tiny restaurants, some which were recommended, and some we stumbled across.
Wednesdays and Saturdays are market days in Uzès. We went to the Wednesday morning market which is bustling, located in the town center under beautiful canopy trees called Place aux Herbs. We had fun browsing, and bought some beautiful vibrant red-ribbed tomatoes, olive oil, black olives, Camargue (the wild marshland natural region south of Arles) honey, and more. From the cheesemongers we bought fresh goat cheese medallions and aged Tomme sheep cheese.

Rainbow Swiss Chard at Uzès Wednesday Market
Engaging in conversation with the chatty sheep cheesemonger, Monsieur Cheesemonger gave us this tub of his whipped sheep ricotta cheese as a gift. He wanted us to try it. He suggested it could go with sweet or savory. He said, “Have it for breakfast with fruit and honey, or in the evening with olive oil and herbs on a baguette.” Wow!
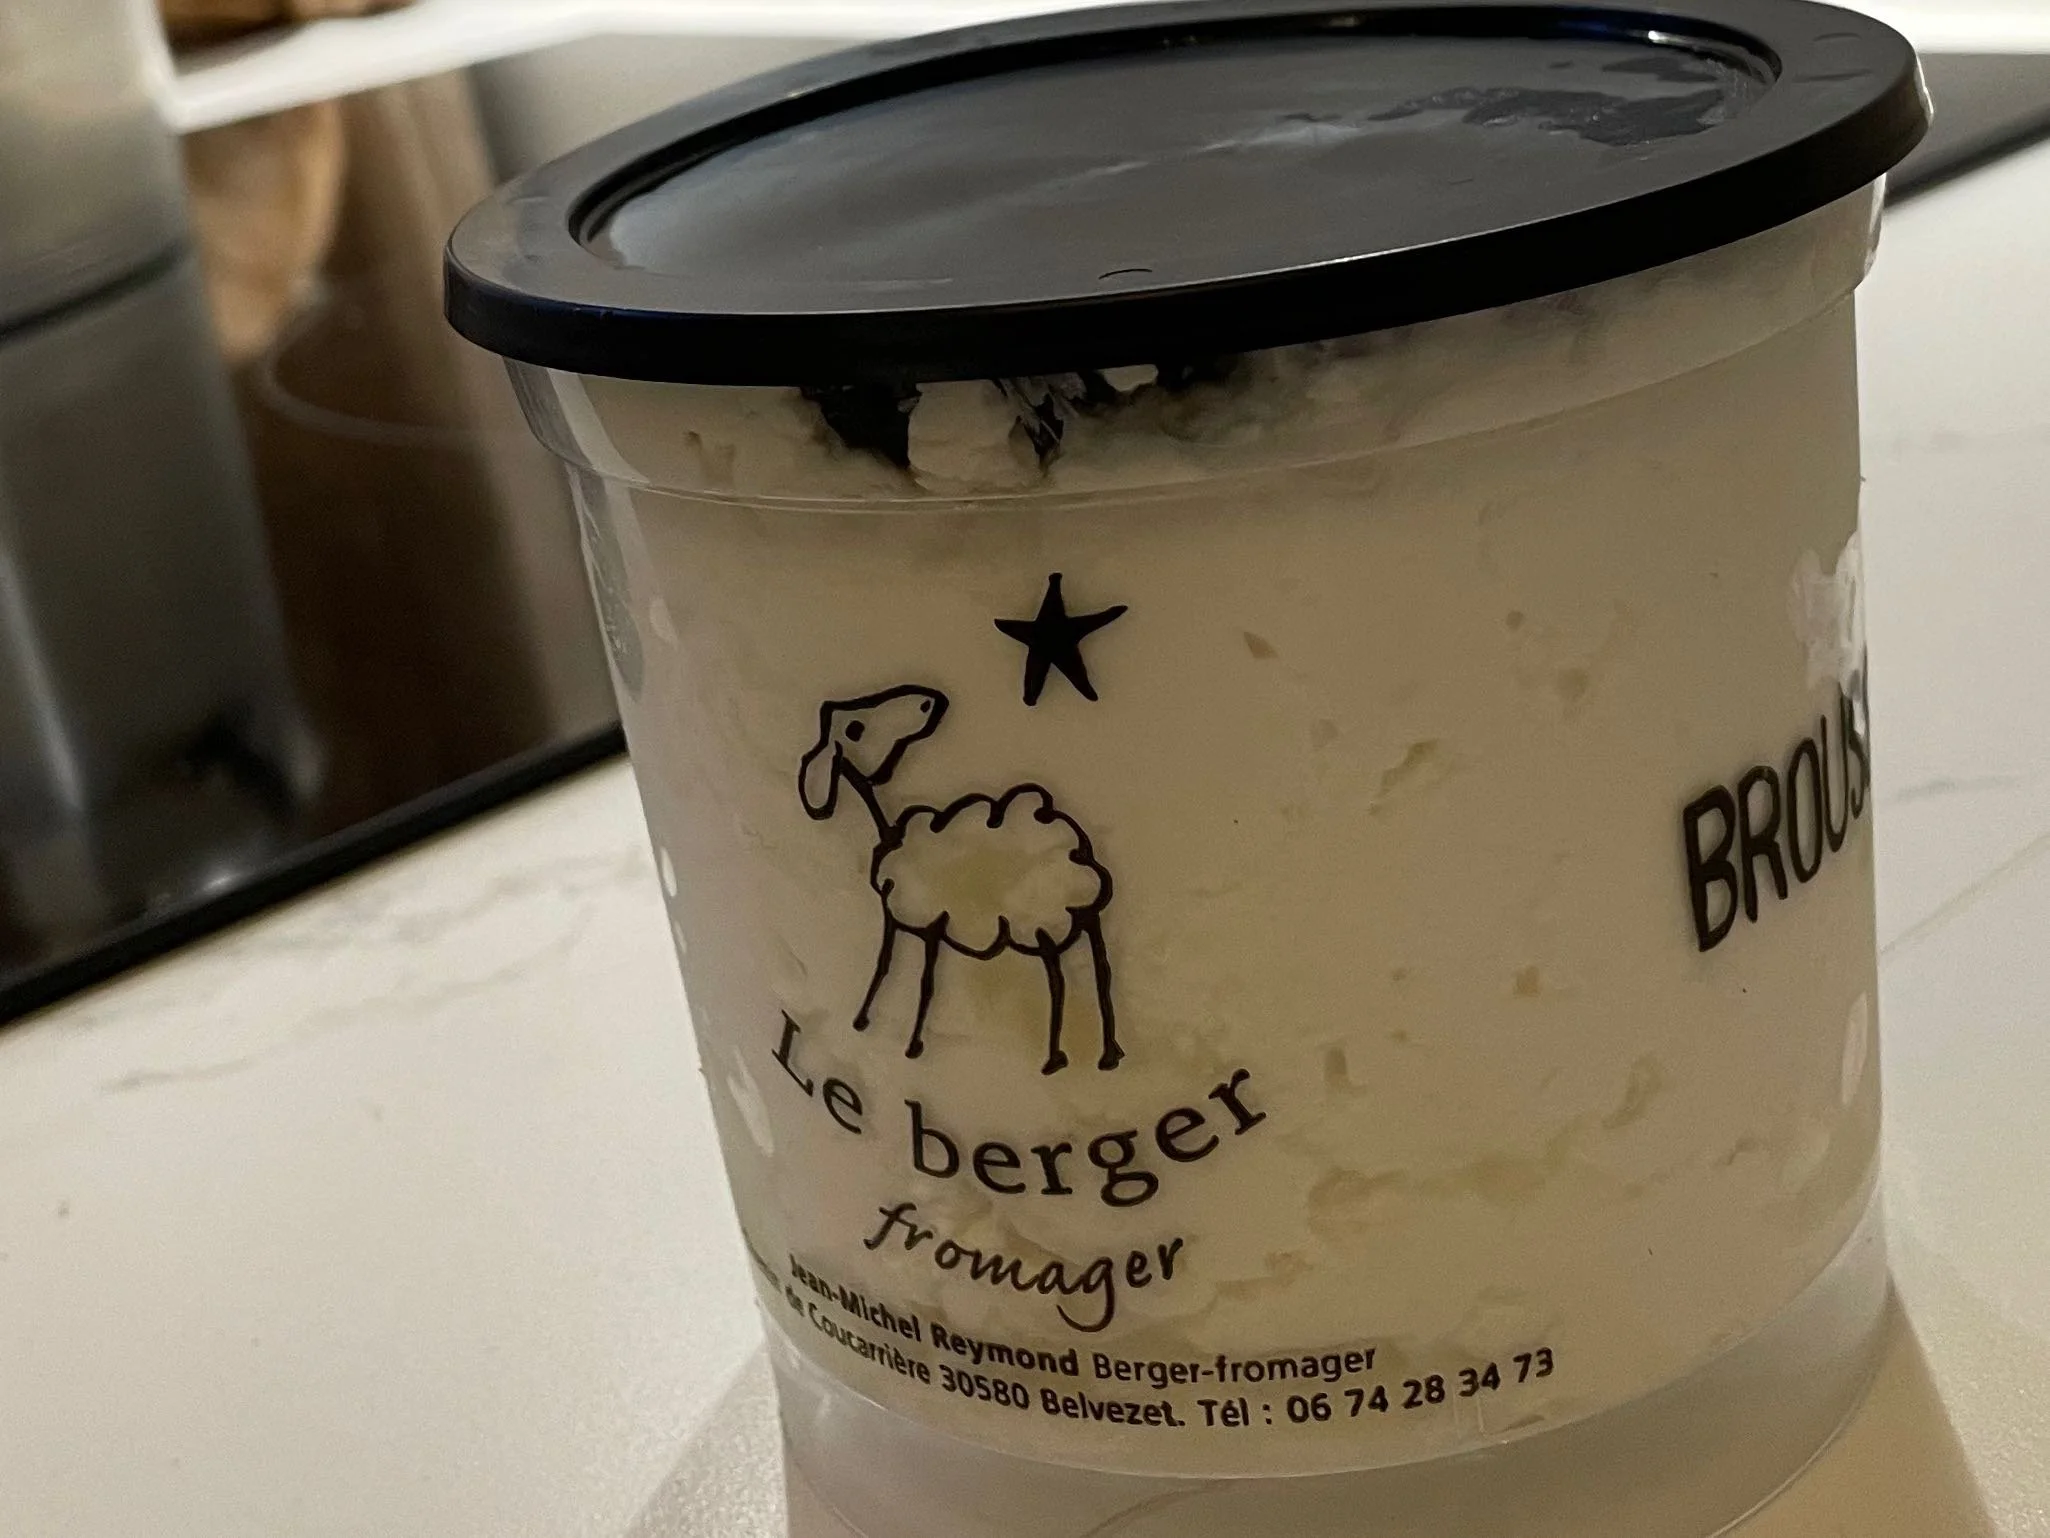
A Gift of Whipped Sheep Ricotta Cheese
I thought for a while, what could I make with this whipped sheep ricotta as a dinner. What came to me was a pasta dish inspired by Half Baked Harvest One Pot Recipes, a sort of loose combination of these two recipes,
One Pot Spinach and Sun-Dried Tomato Burrata Pasta and One Pot Sun-Dried Tomato Pasta with Whipped Ricotta. I had mades these recipes before, and was inspired to do something similar with the ingredients I had. I didn’t have sun-dried tomatoes, but I had wonderful fresh market tomatoes.
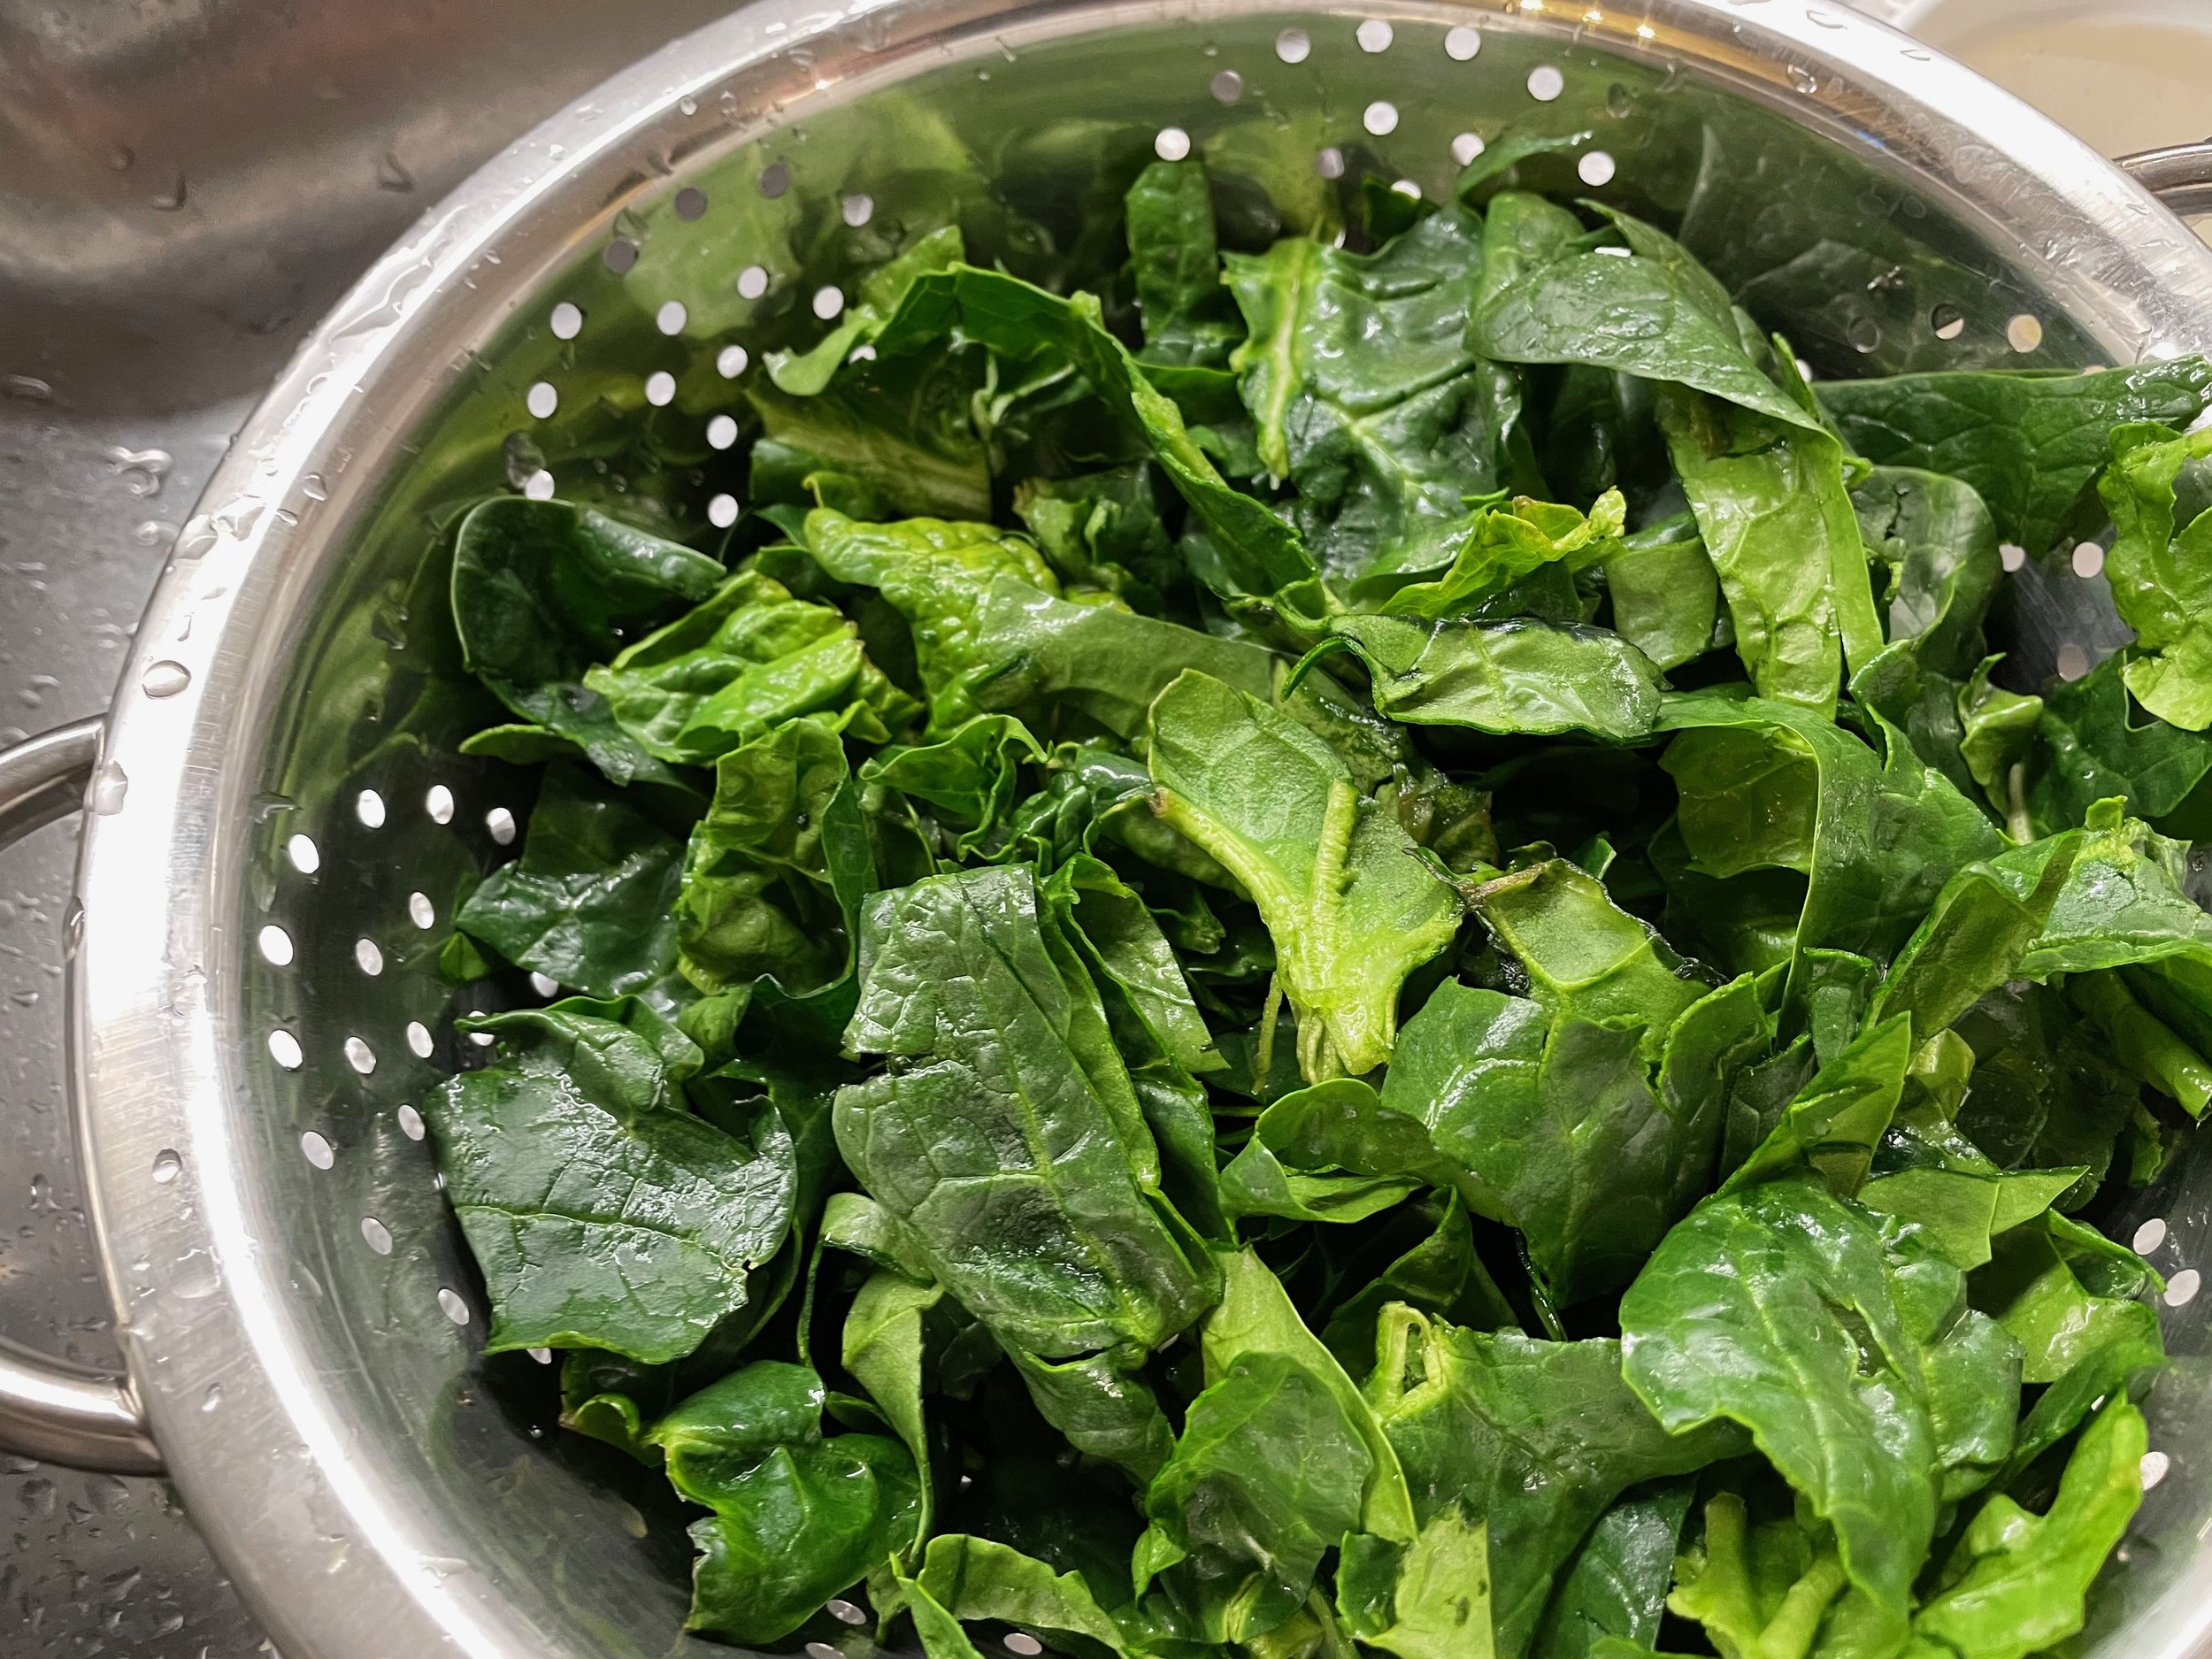
Fresh Spinach Washed, Dried and Cut Up
I prepared the lovely fresh spinach, rinsing, drying, and cutting it up. I added a little Basil Olive Oil to a large pot, and began warming it.
Finely chopped a shallot and sauteed it in the pan. I then added my beautiful market tomatoes ( I wished I had bought more), a couple of tablespoons of rich tomato paste, a tablespoon of balsamic vinegar, chopped black olives, sea salt, and freshly ground pepper. The tomatoes began to break down, and a nice sauce started.
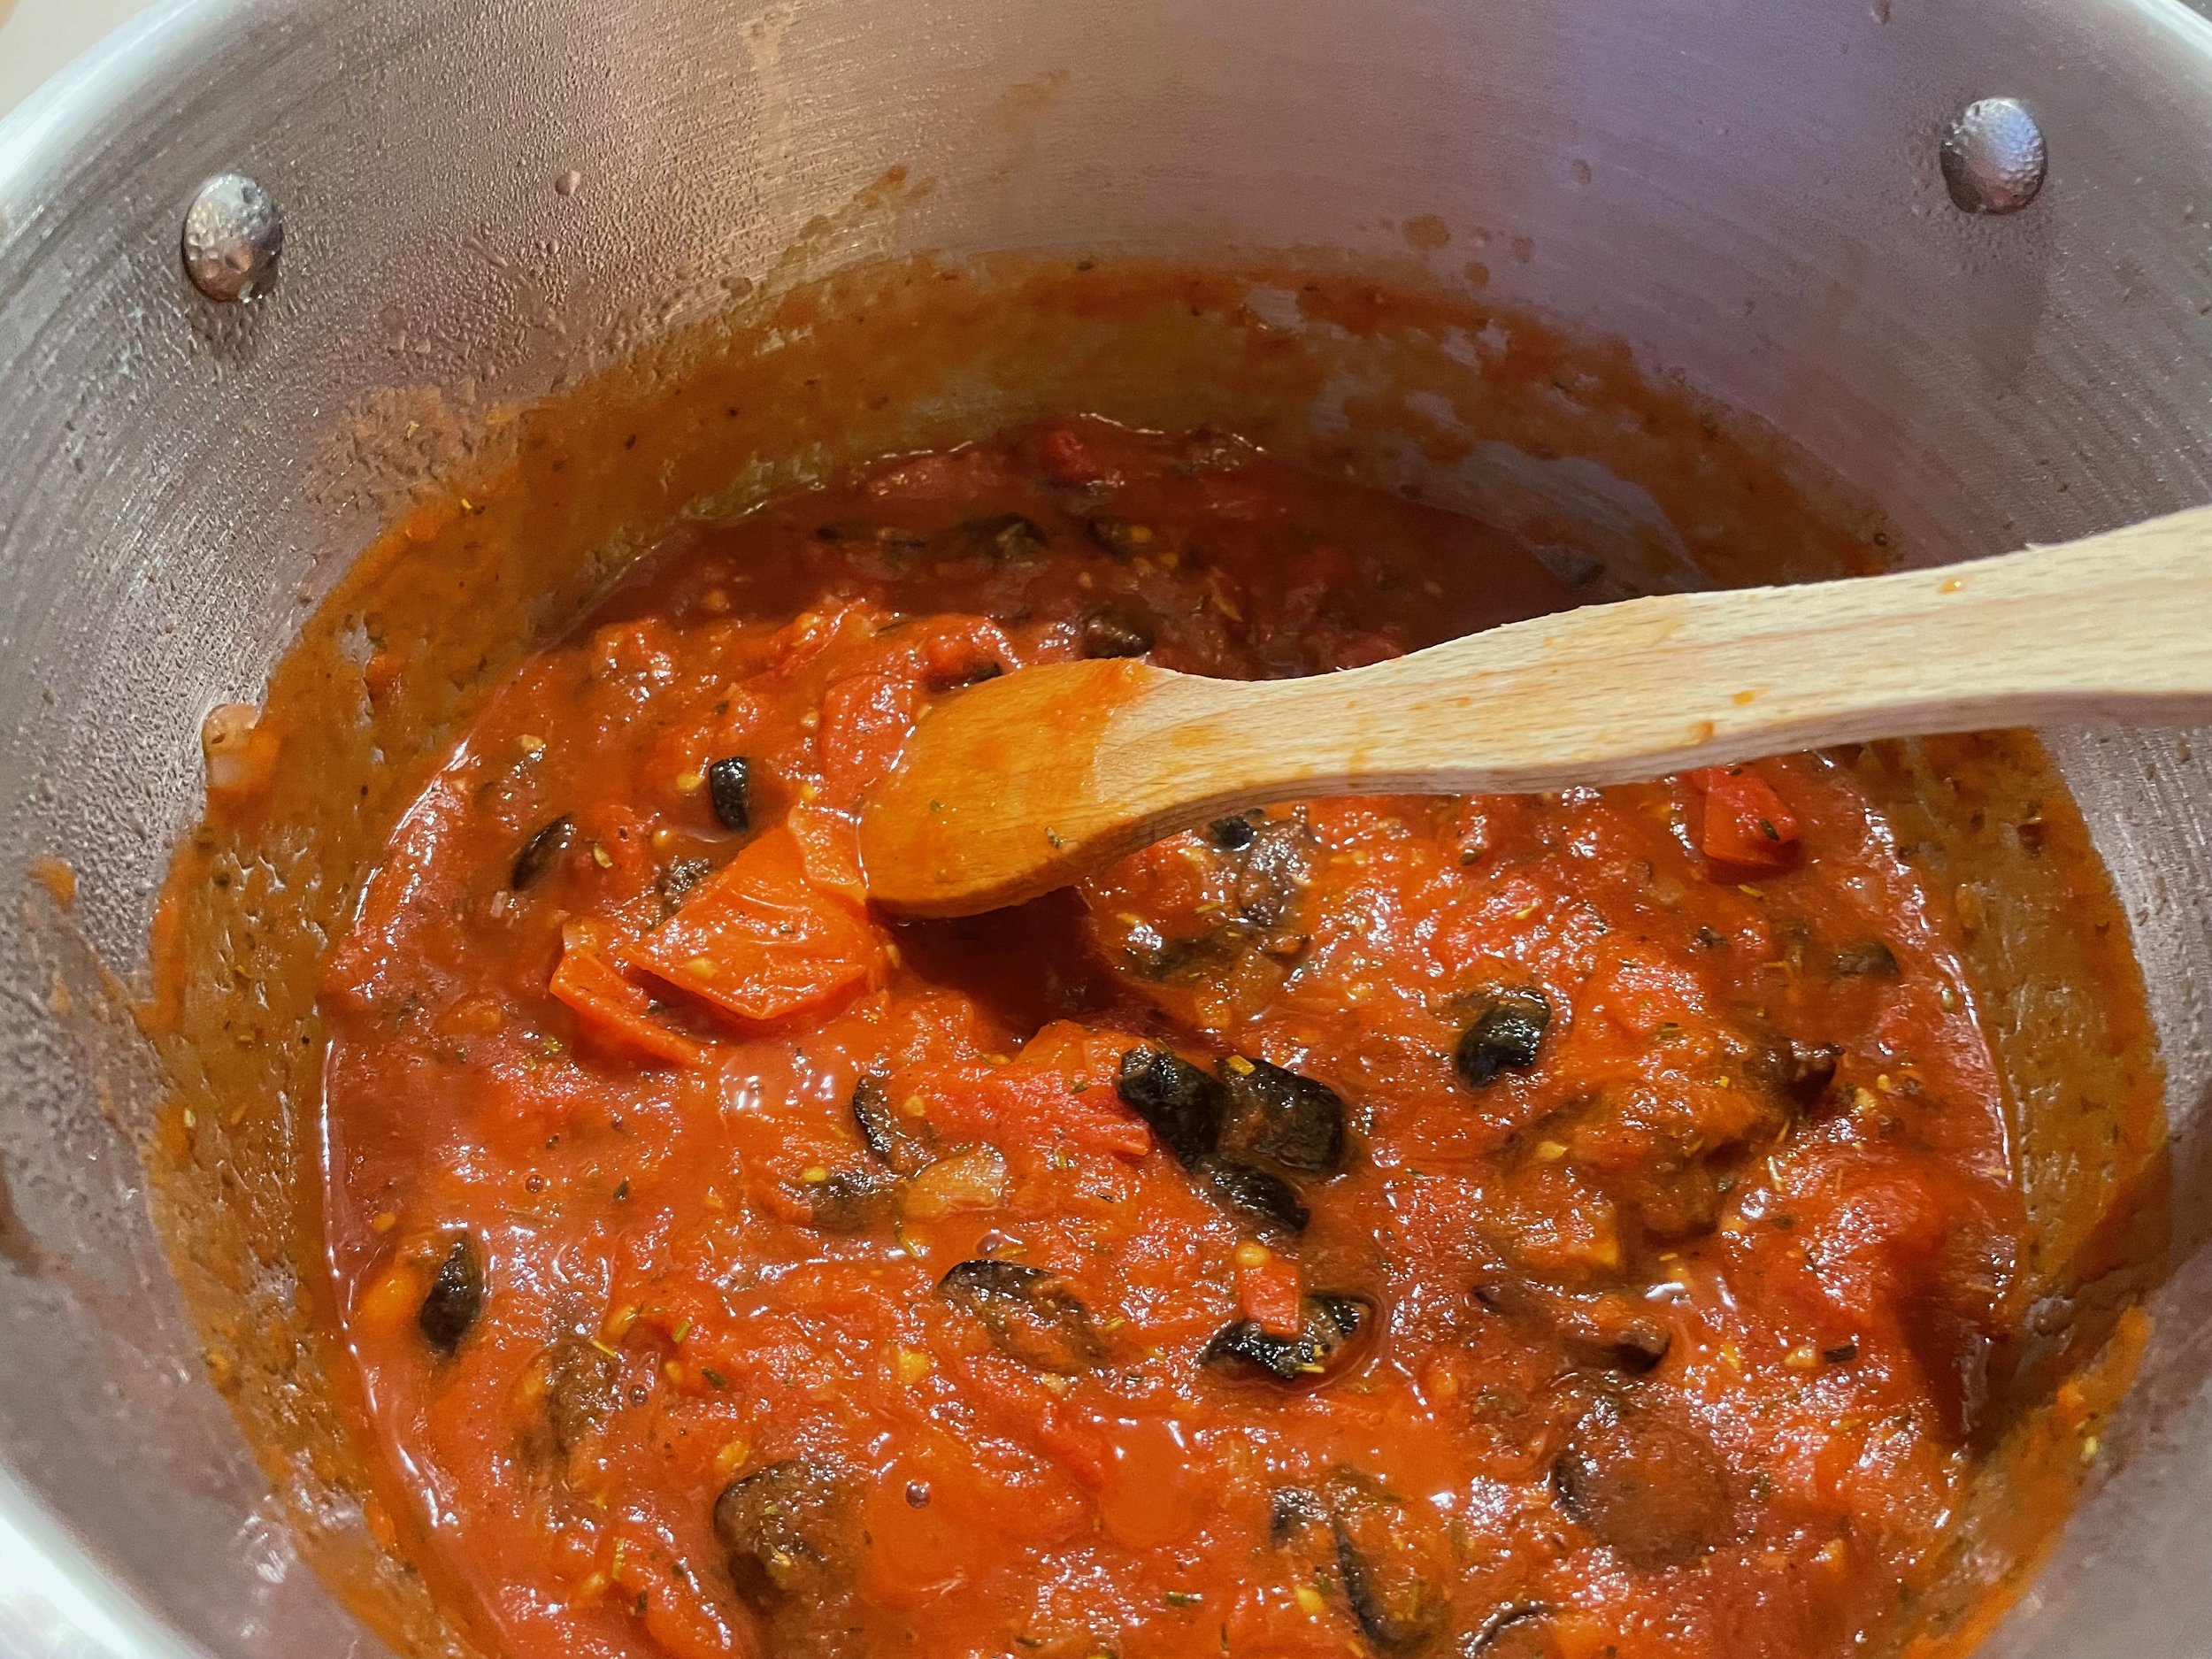
Making Tomato Sauce with Black Olives
When I felt the tomato sauce was ready for the last ingredients, I added 8 ounces of shelled dry pasta, all of the spinach, and about 4 cups of water to the same pot, gently stirring on a medium low heat.
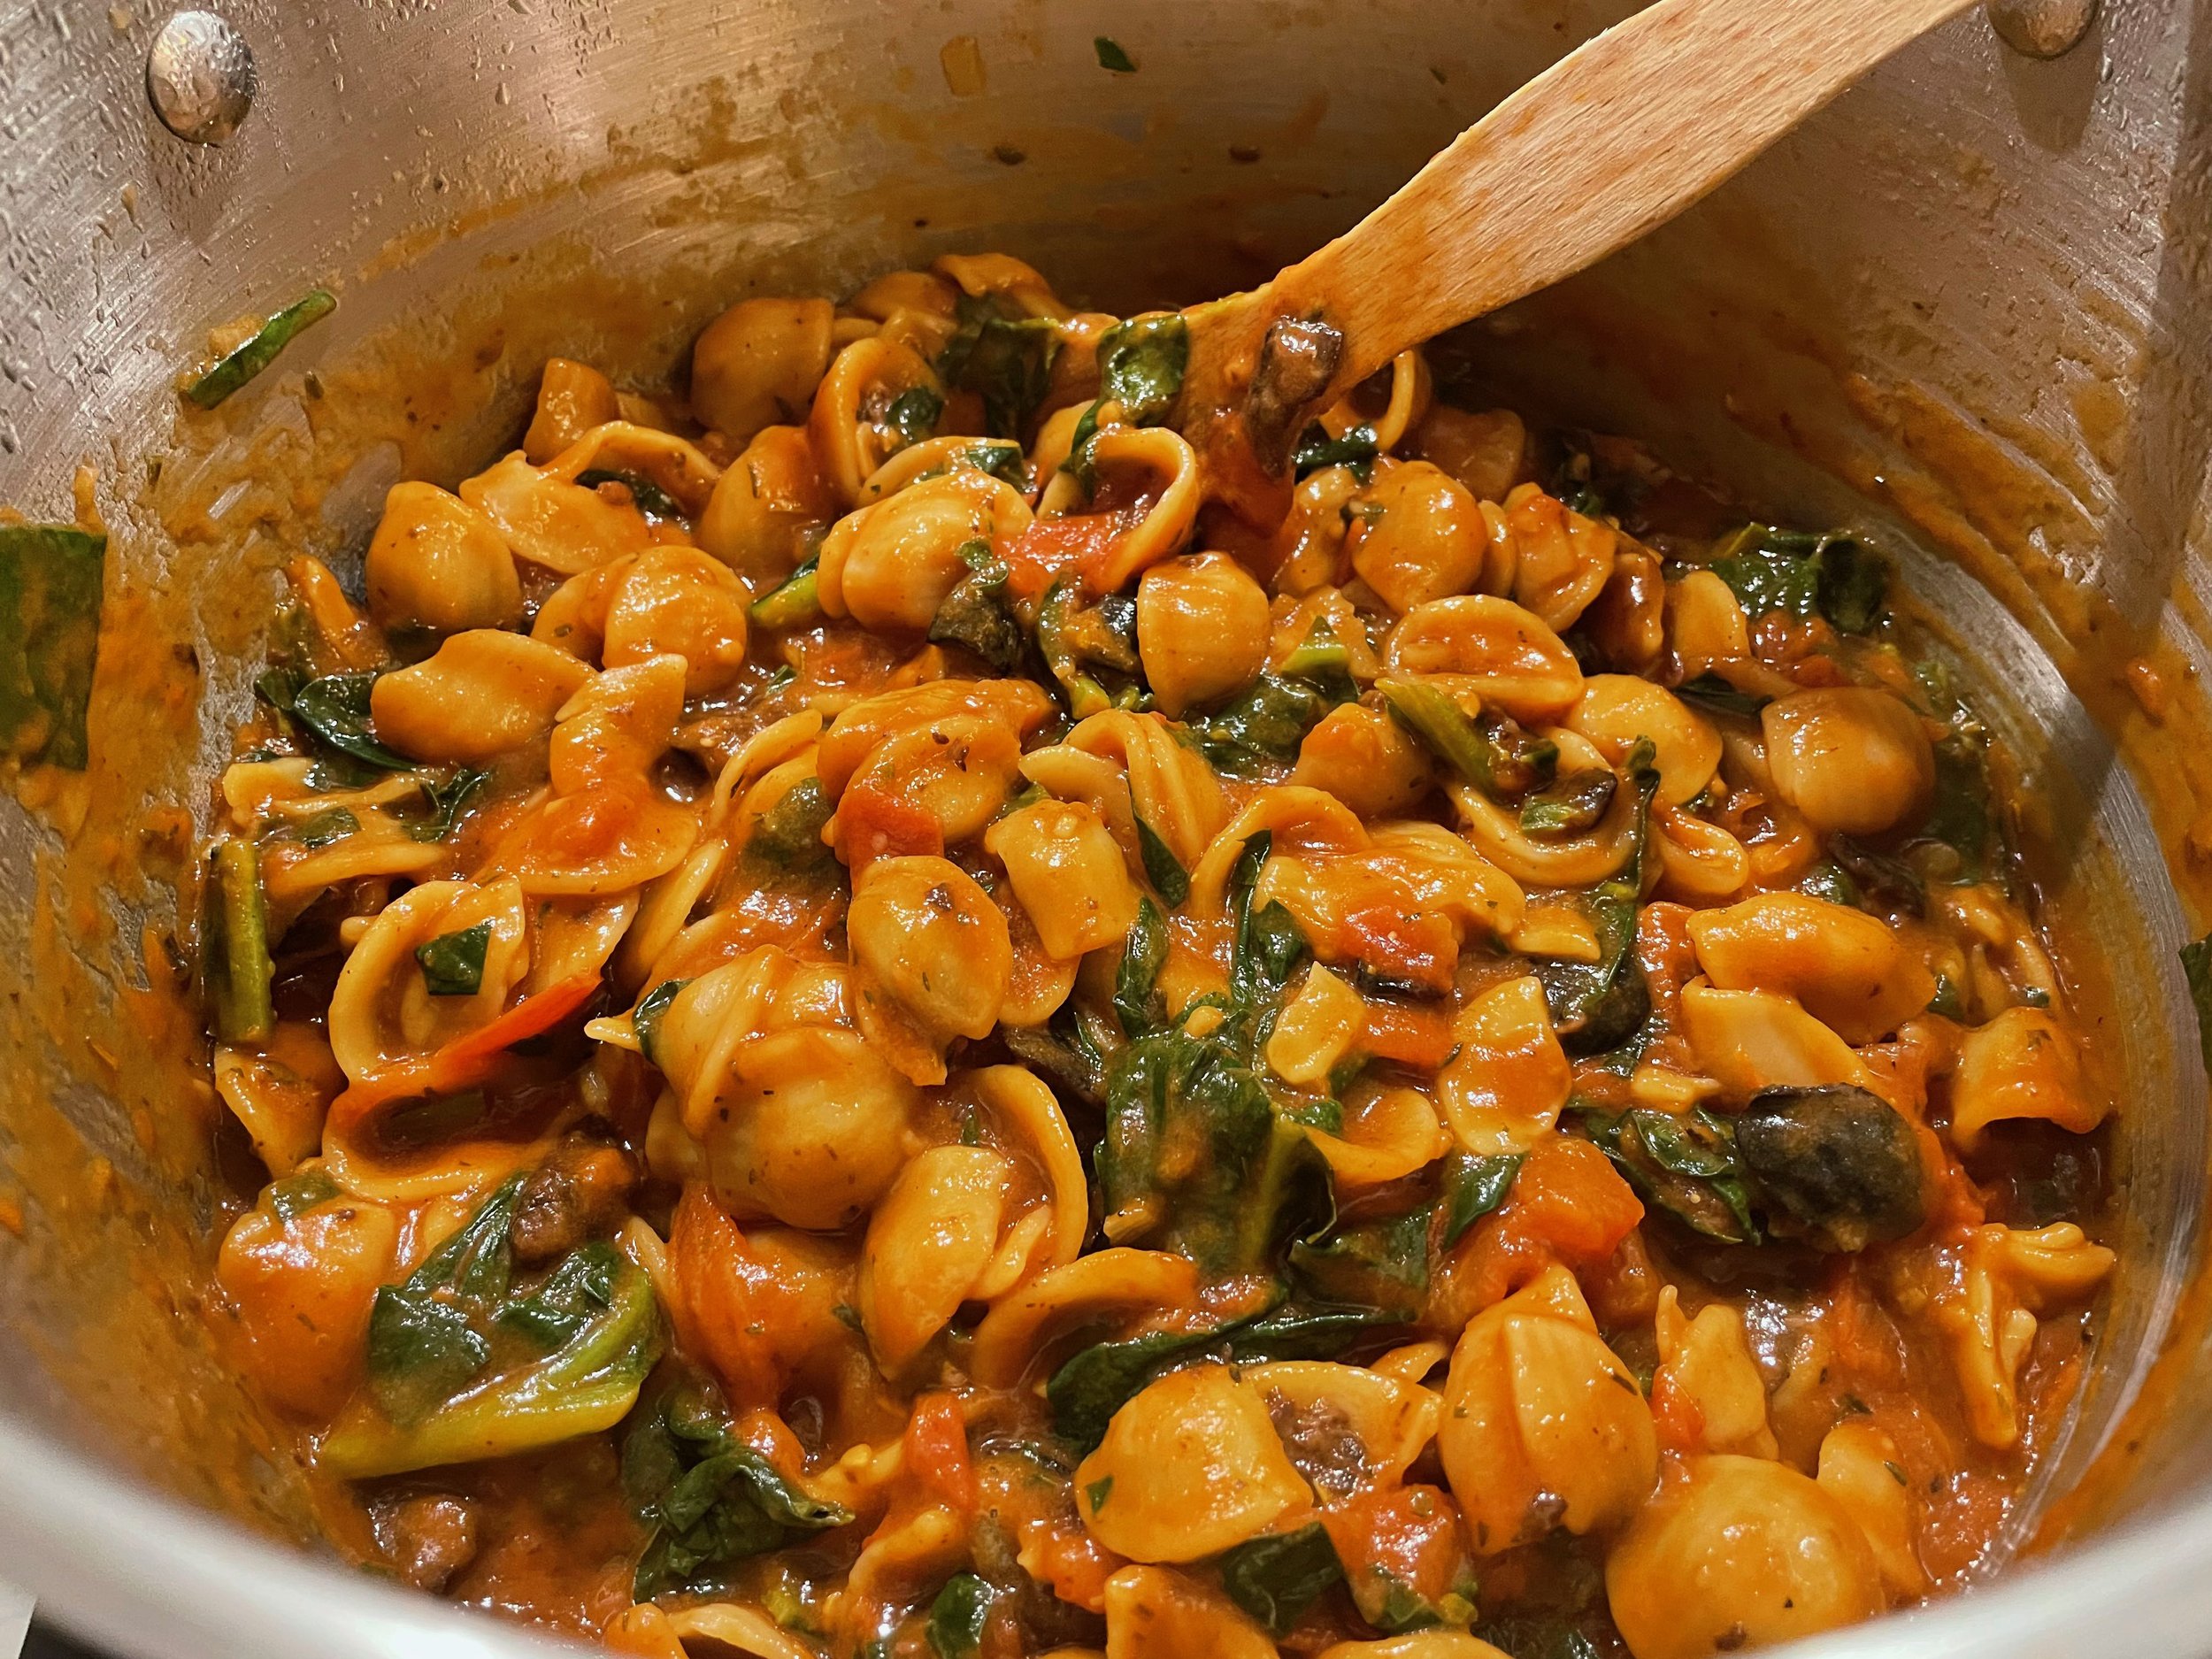
Adding Pasta, Water, and Spinach to the Sauce
Ten minutes or so later, the pasta had absorbed all of the water, and also the beautiful tomato sauce. It was a nice, creamy texture. Since I thought this sheep ricotta cheese was so fresh, and so special, I used it as a topping on the pasta, being very generous with a big dollop, rather than mixing it in with the tomato pasta. I think that was a good idea, because I didn’t want to take away the fresh flavors of the sauce.

One Pot Tomato Pasta with Spinach and Whipped Sheep Ricotta
We had a baguette to serve with our pasta dish, so one could also put the whipped ricotta on the baguette too. My one pot pasta dish turned out beautifully. It was a wonderful relaxing evening in with a delicious dinner and a nice bottle of wine.
I didn’t even mention the wine. Since we are winemakers, we always like to explore the wines of the area when we travel. The wine in this area is very, very good, and quite reasonable. Many of these wines are made with the Syrah, Grenache, Mourvèdre grape varietals. We befriended the local savvy wine merchant, who suggested a few local bottles for us to try. Chin! Chin!

à Table, Chin Chin, et Bon Appétit!
Not to forget dessert. The French really have some amazing desserts and pastries to tempt you. Earlier in the day, we stopped at our favorite boulangeries/pâtisserie and picked up a Lemon Meringue Tart for dessert. Heaven. I hope you enjoyed, Dreamy Dinner Chez Nous!

Splitting a Lemon Meringue Tart for Dessert
Bon Appétit et Bon Weekend…Bonnie